Showing posts with label polished pink. Show all posts

Monday, 21 March 2022

For the Record

For the Record Card

All images © 1990-2021 Stampin’ Up!®


Supplies:


• Stamp Sets: For the Record (158066)
• Card Stock and Paper:Basic White Thick (159229); Basic White (159276); Basic Black (121045); Coastal Cabana (131297)
• Stamp Pads: Coastal Cabana (147097);Polished Pink (155712); Tuxedo Black Memento (132708)
• Tools: Amazing Thanks Dies (157816)
• Miscellaneous: 2021-23 In Color Jewels (155571); Foam Adhesive Strips (141825)Stampin’ Dimensionals (104430)Stampin’ Seal Adhesive (152813)


Measurements:


• Basic White Thick: 8 1/2” x 5 1/2”
• Basic White: 4 ¾” x 3 ½”
• Basic Black: 5” x 3 ¾”, plus scraps
• Coastal Cabana: 4 7/8” x 3 5/8”


Instructions:


1. Score Basic White cardstock in half on long side and fold on score line.
2. Adhere Basic Black cardstock to card front using Dimensionals.
3. Adhere Coastal Cabana cardstock to card front using Dimensionals.
4. Stamp record player using Coastal Cabana, Tuxedo Black Memento, and Polished Pink Inks.
5. Place “thanks” die on stamped cardstock as shown, and die cut skinnier word thanks.
6. Adhere white cardstock that has “thanks” die cut out of it to card front.
7. Die cut Basic Black “thanks” die (larger outline die)  and adhere to card front using Foam Adhesive Strips to give it a pop.
8. Adhere white die cut “thanks” to black outline “thanks” on card front.
9. Adhere 2 In Color Jewels to center of record player.
Continue Reading
No comments
Share:

Tuesday, 22 February 2022

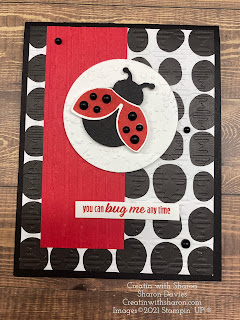
It's all About the Ladybug


Its's all about the Ladybug!


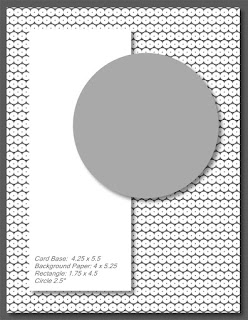
Here's the card sketch I did for my Facebook live. 
I did change it up for the live. I was wanting a Girlie card. 
So I did her in Polished Pink. 
You can definitely do it in any colour you wish. 


Here's the mesurement I used for the card. 
Easy Peasy!


Here's the Bits & Bobs and a video. 
Enjoy and please subscribe to my YouTube Channel. 


Thanks for stopping by. 

Cheers 

Sharon xoxo


Product List

Continue Reading
No comments
Share:

Saturday, 5 February 2022

Honeybee Home

Honeybee Home

All images © 1990-2022 Stampin’ Up!®


Supplies:


• Stamp Sets: Honeybee Home (157943) or discounted as a bundle with the Honeybee Blooms Dies (157952)
• Card Stock and Paper: Basic White (159276)Basic Black (121045)Pool Party (122924); Polished Pink (155710)
• Stamp Pads: Tuxedo Black Memento Ink Pad (132708)
• Tools: Stitched Rectangles Dies (151820); Hive 3D Embossing Folder (157955); Stampin’ Cut & Emboss Machine (149653); Bone Folder (102300); Paper Snips (103579); Paper Trimmer (152392)
• Miscellaneous: Daffodil Delight Stampin’ Blends Combo Pack (154883); Pool Party Stampin’ Blends Combo Pack (154894); Old Olive Stampin’ Blends Combo Pack (154892); Polished Pink Stampin’ Blends Combo Pack (155520); Iridescent Rhinestone Basic Jewels (158130); Bumblebee Trinkets (155568); Stampin’ Dimensionals(104430)Mini Stampin’ Dimensionals (255209); Stampin’ Seal Adhesive (152813)Mini Glue Dots (103683)


Measurements:


• Polished Pink: 5 ½” x 8 ½”, scored at 4 ¼”
• Basic Black: 3 ¾” x 5”
• Pool Party3 ¾” x 5”
• Basic White: 4” x 5 ¼”; 2” x 3 ¾”; scrap


Instructions:


1. Fold card base and attach Basic Black piece to card front.
2. Using Hive 3D embossing folder, emboss Pool Party piece.  NOTE:  This piece was cut large because of the embossing process changes its’ size but not uniformly.  Once embossed, trim down to 3 5/8” x 4 7/8”. Attach to card front.
3. Cut 2” x 3 ¾” Basic White piece using Stitched Rectangle die.  Using Tuxedo Black Memento ink, stamp flower in center.  Color using light and dark Polished Pink Blends markers and the light and dark Old Olive Blends markers.  Attach to card front using Dimensionals.
4. Using Black Memento ink, stamp left-facing and right-facing bees on Basic White scrap.  Die cut.  Color using light Daffodil Delight and light Pool Party Blends markers.  Attach to card front using Mini Dimensionals.
5. Attach one large and one small Iridescent Rhinestone to front of card.
6. Inside of card:  Using Tuxedo Black Memento ink, stamp sentiment and flower on 4” x 5 ¼” Basic White piece.  Color flowers using light and dark Polished Pink Blends markers and the light and dark Old Olive Blends markers.  Attach piece to inside of card.
7. Attach one bumblebee trinket using Mini Glue Dot.


Continue Reading
No comments
Share:

Tuesday, 1 February 2022

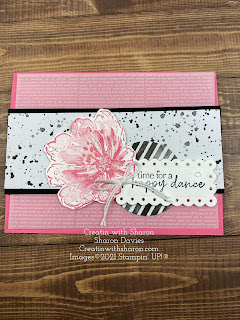
Flowing Flowers Card 3


 SUPPLY LIST
Stamps: 157880 Flowing Flowers
Paper: 158039 Abstract Beauty Designer Series Paper, 159276 Basic White Cardstock, 153080 Polished Pink Cardstock, Basic Black Cardstock, 158068 Supple Shimmer Specialty Paper, 157764 Vellum Layering Designs
Ink: 132708 Memento Ink Pad, 153117 Polished Pink Ink Pad
Embellishments: 155475 Baker’s Twine Essentials Pack, 158134 Polished Dots, 104430 Stampin' Dimensionals, 103683 Mini Glue Dots
Tools: 149653 Stampin’ Cut & Emboss Machine, 151770 Layering Circles Dies, 155560 Scalloped Contours Dies, 103579 Paper Snips Scissors
DIRECTIONS
1. Cut Polished Pink Cardstock to 8-1⁄2” x 5-1⁄2” and fold in half.
2. Cut Vellum to 5-1⁄4” x 4” and attach to card base (adding adhesive only to the middle section).
3. Cut Designer Series Paper to 5-1⁄2” x 2” and layer on Basic Black Cardstock cut to 5-1⁄2” x 2-1⁄4”.
4. Cut Supple Shimmer Specialty Paper to 5-1⁄2” x 1”, layer behind Basic Black and attach panel to Vellum
layer.
5. Die-cut circle from Designer Series Paper with Layering Circles Dies and attach to panel. (USE the circle left
over from card #1)
6. Die-cut label from Basic White Cardstock with Scalloped Contours Dies, stamp sentiment in Memento and
attach to card with Dimensionals.
7. Stamp flower on Basic White Cardstock in Polished Pink, cut out with Paper Snips and attach to card with
Dimensionals.
8. Tie a double bow of Basic White Twine and attach to flower with Mini Glue Dots.
9. Embellish card with Polished Dots.
Here’s the video 

Continue Reading
No comments
Share:

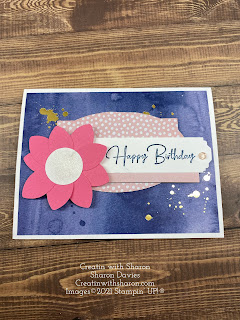
Flowing Flowers Card 2


SUPPLY LIST
Stamps: 157880 Flowing Flowers
Paper: 158039 Abstract Beauty Designer Series Paper, 159276 Basic White Cardstock, 159229 Basic White Thick Cardstock, 153080 Polished Pink Cardstock,
Ink: 147110 Misty Moonlight Ink Pad
Embellishments: 158140 Cotton Ribbon Combo Pack, 158134 Polished Dots, 104430 Stampin' Dimensionals, 103683 Mini Glue Dots
Tools: 149653 Stampin’ Cut & Emboss Machine, 153585 Hippo & Friends, 152883 Lovely Labels Pick A Punch, Ladybug Punch, 1” Circle Punch
DIRECTIONS
1. Cut Basic White Thick Cardstock to 8-1⁄2” x 5-1⁄2” and fold in half.
2. Cut Designer Series Paper to 5-1⁄4” x 4” and attach to card base.
3. Die-cut label from Designer Series Paper with Season Labels Dies and attach to card.
4. Cut a 1” strip of Basic White Cardstock and stamp sentiment in Misty Moonlight. Trim one end with Lovely
Labels Pick A Punch. Cut Designer Series Paper to 2” x 1”, layer behind sentiment and attach label to card
with Dimensionals.
5. Punch out 5 Wings of the Lady Bug and layer together to form the flower from Polished Pink Cardstock.
Punch out circle from Basic White Cardstock with 1” Circle Punch and layer on flower. Attach flower to
card with Dimensionals.
6. Tie a bow of Misty Moonlight Ribbon and attach to flower with Mini Glue Dots.

Here’s my video 


Continue Reading
No comments
Share:

Thursday, 27 January 2022

New Horizon


The New Horizon Designer Series Paper is simply gorgeous!
As you can see there’s no Stampin on the image what so ever. 
I put this car together in a matter of minute. 
Super easy and perfect for the beginner stamper.,


Here’s the Bits and Bobs 
Base- 8 1/2“ x 5 1/2“ scored on the long side at 4 1/4 “
First layer is 4” x 5 1/4” and this piece is embossed. And glued to your card base. 
Cut your DSP into three strips One is 1 1/8”x 4” the next is 1” x 4” and the last one is  3/4”x4”
Adhesive them all onto a piece of card stock that’s 3 3/8”x 4 1/4”
I then ran the above piece through my stamping cut and boss machine using the stripes and splatters and Embossing holder. 
Stamped the sentiment onto a piece of scrap a basic white. With one of the dies from the Beautiful Shapes  cut it out and adhere to your card front using dimensionals.

Thanks so much for stopping by. 


Cheers 🍻 
Sharon Xoxo 


 Product List 

Continue Reading
No comments
Share:

Sunday, 16 January 2022

Flowing Flowers


 Flowing Flowers

All images © 1990-2022 Stampin’ Up!®


Supplies:


• Stamp Sets: Flowing Flowers (157880)
• Card Stock and Paper: Basic White Cardstock (CS) (159276); Polished Pink CS (155710); In Color 2021-2023 6” x 6” Designer Series Paper (DSP) (155641)
• Stamp Pads: Balmy Blue Classic Stampin’ Pad (147105); Soft Succulent Classic Stampin’ Pad (155778); Polished Pink Classic Stampin’ Pad (155712)
• Tools: Stitched Rectangle Dies (151820); Stampin’ Cut & Emboss Machine (149653); Paper Trimmer (152392); Bone Folder (102300); Take Your Pick (144107); Silicone Craft Sheet (127853)Blending Brushes (153611); Clear Block E (118484); Simply Shammy (147042)
• MiscellaneousGenial Gems (155500); Stampin’ Dimensionals (104430)Multipurpose Liquid Glue (110755)


Measurements:


• Basic White: 1/2” x 5 ½”3/8 x 4 1/8”; 4 ½” x 3”
• Polished Pink: 3 5/8” x 2 1/4
• In Color 2021-2023 DSP: 5 1/4” x 5/8”; 5 ¼” X 1 7/8” 


Instructions:


1. Score and fold the 8 ½” x 5 ½” Basic White CS at 4 ¼” on the long side to create the card base. Burnish the fold line with the bone folder to create a crisp fold.
2. Use the Blending Brushes to apply Balmy Blue ink and Soft Succulent ink to the 5 3/8” x 4 1/8” Basic White CS. Start at the top with Balmy Blue and blend downward to the Soft Succulent. Overlap the two colors about 1 ½” from the bottom. Adhere to the card base with Multipurpose Liquid Glue.
3. Arrange and adhere the DSP strips to the card front.
4. Stamp the large flower from the Flowing Flowers with Polished Pink ink onto the 4 ½” x 3” Basic White CS and die cut with 3 ¾” x 2 3/8” Stitched Rectangle Die. Adhere this to the Polished Pink CS with Multipurpose Liquid Glue and embellish with the Genial Gems. Attach this piece to the card front with Stampin’ Dimensionals.


Continue Reading
No comments
Share:

Sunday, 19 December 2021

In Bloom


In Bloom

All images © 1990-2021 Stampin’ Up!®


Supplies:

• Stamp Sets: In Bloom (158218
• Card Stock and Paper: Basic Black Card Stock or (CS) (121045)Polished Pink Card Stock (155710)Old Olive Card Stock (100702);Daffodil Delight Card Stock (119683); Basic White Card Stock (159276);Patterned Party Designer Series Paper (DSP) (155426)
• Stamp Pads: Tuxedo Black Memento Ink (132708)
• Tools: Pierced Blooms Dies (154312); Tasteful Textile 3D Embossing Folder (152718)
• Miscellaneous: Gilded Gems(152478); Polished Pink 3/8” Open Weave Ribbon (154312); StampinDimensionals (104430)Stampin’ Seal Adhesive (152813); Mini Glue Dots (103683)


Measurements:


• Basic Black: 8 1/2” x 5 ½” (card base); 4” x 5 ¼” (front panel)
• Scraps for die cutting flowers, leaves and label: Polished Pink, Old Olive, Basic White
• Black and White Buffalo Check pattern (DSP): 2” x 5 1/8” 
• White with black specs pattern (DSP): 2 ½” x 4” 
• Polished Pink Ribbon: 12”


Instructions:


1. Fold card base in half using bone folder 
2. Emboss the front panel using the tasteful textile 3D embossing folder 
3. Glue the DSP as per the photo using Stampin’ Seal 
4. Die cut the flowers and labels using the Pierced blooms dies 
5. Stamp the sentiment using memento ink 
6. Glue the label using dimensionals
7. Glue the flowers and leaves as per the picture using dimensionals and glue dots 
8. Make the bow and glue it to the card with glue dots
9. Add gilded gems to the flower centers as well as the card as per the picture


Continue Reading
No comments
Share: