Showing posts with label #Creatinwithsharon Misty Moonlight. Show all posts

Tuesday, 1 February 2022

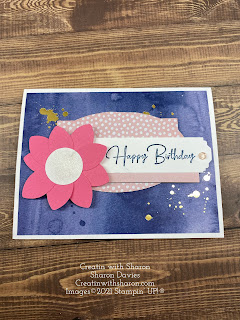
Flowing Flowers Card 2


SUPPLY LIST
Stamps: 157880 Flowing Flowers
Paper: 158039 Abstract Beauty Designer Series Paper, 159276 Basic White Cardstock, 159229 Basic White Thick Cardstock, 153080 Polished Pink Cardstock,
Ink: 147110 Misty Moonlight Ink Pad
Embellishments: 158140 Cotton Ribbon Combo Pack, 158134 Polished Dots, 104430 Stampin' Dimensionals, 103683 Mini Glue Dots
Tools: 149653 Stampin’ Cut & Emboss Machine, 153585 Hippo & Friends, 152883 Lovely Labels Pick A Punch, Ladybug Punch, 1” Circle Punch
DIRECTIONS
1. Cut Basic White Thick Cardstock to 8-1⁄2” x 5-1⁄2” and fold in half.
2. Cut Designer Series Paper to 5-1⁄4” x 4” and attach to card base.
3. Die-cut label from Designer Series Paper with Season Labels Dies and attach to card.
4. Cut a 1” strip of Basic White Cardstock and stamp sentiment in Misty Moonlight. Trim one end with Lovely
Labels Pick A Punch. Cut Designer Series Paper to 2” x 1”, layer behind sentiment and attach label to card
with Dimensionals.
5. Punch out 5 Wings of the Lady Bug and layer together to form the flower from Polished Pink Cardstock.
Punch out circle from Basic White Cardstock with 1” Circle Punch and layer on flower. Attach flower to
card with Dimensionals.
6. Tie a bow of Misty Moonlight Ribbon and attach to flower with Mini Glue Dots.

Here’s my video 


Continue Reading
No comments
Share:

Friday, 29 October 2021

Sweets & Treats

Sweets & Treats.

 Here’s the card I CASEd from the Mini Catalogue. 
It’s on page 11. I changed it up a bit with the colours.
Are you loving the colour combo? 
I must say the Misty Moonlight is one of my favourites.
And it works so well with the Petal Pink.
The fruit cake and cake plate is coloured with 
Watercolouring Pencils.


 Here’s the Bits & Bobs for this card.
You can watch the video to see how I coloured.
Base 8 1/2”x 5 1/2”
First layer is 5 1/2”x 4” 
The first square is 3 1/2” x 3 1/2”
The next one, it’s the one you’ll stamp your image on is 
3 1/4”x 3 1/4”
You’ll need a piece for your sentiment that 1”x 2 1/2”
If you’d like see how I put together, please feel free to watch the video. 

Thank You so much for stopping by! 
Greatly appreciated.

Cheers 🍻 
Sharon Xoxo 


Product List

Continue Reading
No comments
Share: