Showing posts with label blends. Show all posts

Thursday, 14 April 2022

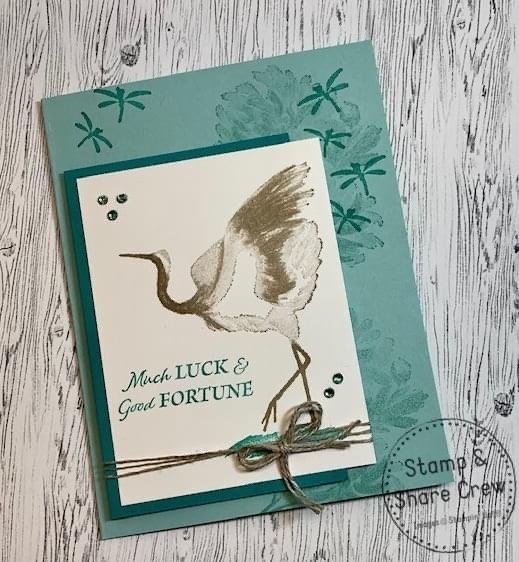
Crane of Fortune

Crane of Fortune

All images © 1990-2022 Stampin’ Up!


Supplies:


• Stamp Sets: Crane of Fortune (157654)
• Card Stock and Paper: Pool Party(122924); Bermuda Bay (131197); Basic White (159276)
• Stamp Pads: Pool Party (147107);Bermuda Bay (147096); Sahara Sand (147117)
• Miscellaneous: Linen Thread (104199);Rhinestone Basic Jewels (144220); Stampin’ Blends Combo Bermuda Bay (154878); Stampin’ Dimensionals(104430); Stampin’ Seal Adhesive (152813)


Measurements:


• Pool Party: 8 1/2” x 5 1/2” Base
• Bermuda Bay: 4 ¼” x 2 ¾”
• Basic White: 4” x 3”; 5 ¼” x 4” for inside
• Linen Thread – 16” to wrap and 12” to tie double bow


Instructions:


1. Score and fold base on the long side at 4 ¼”
2. Using Pool Party ink, stamp the large flower image two times along the right side of card front; and once in the bottom right corner of the inside Basic White layer.
3. Using Bermuda Bay ink, stamp the two dragonfly duos three times as shown on the card front; and once on the flower on the inside layer.
4. Stamp the Crane to the right side of the smaller Basic White layer using the Sahara Sand ink; then stamp the sentiment to the left of it with Bermuda Bay.  Layer this layer on the Bermuda Bay layer centering side to side; but leaving an even border on the left and the white hanging over on the right side.
5. Adhering the Linen Thread on the back wrap it three times around these; then tie a double bow with the 12” of Linen Thread and adhere to front as shown.
6. Pop this entire layer up on the base with Stampin’ Dimensionals over to the left side and nearer the bottom so Dragonflies show.
7. Color 5 small Rhinestone Basic Jewels with one of the Bermuda Bay Stampin’ Blends and add them to the cardfront.  
8. Place the larger stamped white layer centered on the inside to write on.


Continue Reading
No comments
Share:

Saturday, 9 April 2022

Eclectic Garden

Eclectic Garden 

All images © 1990-2022 Stampin’ Up!®


Supplies:


• Stamp Sets: Eclectic Garden (157871)
• Card Stock and Paper: Basic White (159276); Granny Apple Green (1469900; Gray Granite (146983); Pattern Party (155426) Host Paper
• Stamp Pads: Gray Granite (147118); Memento Ink (132708)
• Tools: Paper Trimmer (152392); Paper Snips Scissors (103579); Simply Scored Scoring Tool (122334); 

Bone folder (102300); Tailored Tag Punch (145667)

• Miscellaneous: Multipurpose Glue (110755); Stampin Dimensionals (104430); Glue Dots (103683); Silver & Clear Epoxy Essentials (155567); Fan Baker’s Twine (158143); Granny Apple Green Blends (154885); Real Red Blends (154899); Color Lifter (144608)


Measurements:


• Granny Apple Green – 5 ½ x 8 ½ scored at 4 ¼ burnished with bone folder. 
• Basic White – 2 ¾ x 5, 4 x 5 ¼ , scrap for image
• Gray Granite – 2 x 4 ½ 
• DSP – 3 ¾ x 5


Instructions:


1. Stamp the radish image with gray granite ink on the smaller basic white. Rotating image all over. 
2. Stamp radish on the basic white scrap with memento ink and then color with the blends. Fussy cut out with snips. 
3. Adhere the dsp to the card front askew, then add the stamped basic white more to the right over dsp. 
4. Stamp the Thanks so much at the top of the gray granite and flag the end using the Tailored Tag punch, add this over the basic white. 
5. Tie a 3 loop bow and attach to the back of the colored radish with a glue dot. 
6. Attach dimensionals to the radish and put on the gray granite.
7. Scatter clear epoxy drops to the front of the card.

Continue Reading
No comments
Share:

Tuesday, 22 March 2022

Every Chapter

Every Chapter

All images © 1990-2022 Stampin’ Up!®


Supplies:
• Stamp Sets: Every Chapter (158017)
• Card Stock: Blushing Bride (131198), So Saffron (105118), Soft Sea Foam (146988), Balmy Blue (146982), or purchase the Subtles Assortment pack(146978), Thick Basic White (159229), Basic White (159276)
• Stamp Pads: Jet Black StazOn (101406)
• Tools: Bone Folder (102300); Paper Snips (103579)
• Miscellaneous: Stampin’ Blends in Smoky Slate (154904), Daffodil Delight (154883), and Balmy Blue (154830), Iridescent Rhinestone Basic Jewels (158130), Wink of Stella Clear Glitter Brush (141897), Stampin’ Dimensionals (104430), Multipurpose Liquid Glue (110755)


Measurements:

• Thick Basic White card base: 4-1/4” x 11”, scored at 5-1/2” and burnished with the Bone Folder
• Basic White: 3-1/2” x 4-3/4” and scrap about 1-1/2” x 3”
• Scraps of Blushing Bride, Balmy Blue, So Saffron, and Soft Sea Foam.


Instructions:

1. Taking care to center the stack of books image, stamp it onto the Basic White piece with Jet Black StazOn. Reink and stamp the teacup and glasses part of the image onto the Basic White scrap. Color image with Stampin’ Blends then cut out with Paper Snips.
2. Using the card image as a reference, stamp books image on Blushing Bride, Balmy Blue, So Saffron, and Soft Sea Foam scraps. Cut out each full book with Paper Snips. Stamp the 2nd book, from the top, also onto Blushing Bride and cut out the flower. Stamp the bottom book also onto So Saffron then cut out the bookmark.
3. With Stampin’ Dimensionals, adhere the books and teacup parts directly on top of the stamped image on the Basic White piece then that piece onto the card front.
4. With Multipurpose Liquid Glue, affix the flower and bookmark.
5. Add Iridescent Rhinestone Basic Jewel to center of flower.
6. Brush design on teacup with Wink of Stella Clear Glitter Brush.

Continue Reading
No comments
Share:

Sunday, 13 March 2022

Mischievous Mice

Mischievous Mice

All images © 1990-2022 Stampin’ Up!®


Supplies:


•
Stamp Sets: Mischievous Mice (158070)
• Card Stock and Paper: Basic White (159276), You’re A Peach (155686)
• Stamp Pads: Tuxedo Black (132708)
• Tools: Playful Alphabet (152706), Tasteful Textiles embossing folder (152718)
• Miscellaneous: Linen Thread (104199), Stampin’ Dimensionals (104430)
• Stampin’ Blends: Smoky Slate (154904, Pool Party (154894), Balmy Blue (154830), Petal Pink (154893)


Measurements:


• Basic White: 4 ¼” x 11”
• Basic White: 4” x 5 ¼”
• Basic White: scraps
• Just a Peach DSP: 1” x 4”
• Linen Thread: 20” 


Instructions:


1. Cut a 4 ¼” x 11” Basic White card base. Fold in half.
2. Cut a 4” x 5 ¼” Basic White card panel.
3. Cut a 1” x 4” Balmy Blue striped designer paper strip.
4. Adhere the striped designer paper to the panel.
5. Tie a 20” piece of Linen Thread around the designer paper and tie in a bow along the right side.
6. Cut the letters N,O,T,E, from scraps of Basic White cardstock.
7. Emboss the letters using the Tasteful Textile embossing folder.
8. Adhere the letters above the striped designer paper along the right side.
9. Stamp the sentiment above the letters using Tuxedo Black ink.
10. Stamp the mouse image onto a scrap piece of Basic White cardstock using Tuxedo Black ink.
11. Color the image using Smoky Slate, Petal Pink and Balmy Blue Stampin’ Blends.
12. Outline the entire image using light Pool Party Stampin’ Blends.
13. Cut the image and adhere to the panel using Stampin’ Dimensionals.
14. Adhere the panel to the card front using Stampin’ Dimensionals.


Continue Reading
No comments
Share:

Wednesday, 9 March 2022

Nuts & Bolts Happy Birthday

Nuts & Bolts Happy Birthday

All images © 1990-2022 Stampin’ Up!®


Supplies:

• Stamp Sets: Nuts & Bolts (157650); Handsomely Suited (154444)
• Card Stock and Paper: Basic Gray (121044); Bumblebee (153077); Gray Granite (146983); Misty Moonlight (153081); Basic White (159276)
• Stamp Pads: Basic Gray Classic Stampin’ Pad (149165); Misty Moonlight Classic Stampin’ Pad (153118); Memento Ink (132708)
• Tools: Hive 3D Embossing Folder (157955); Paper Snips Scissors (103579); Gray Granite Stampin’ Blends Combo Pack (154886); Smoky Slate Stampin’ Blends Combo Pack (154904); So Saffron Stampin’ Blends Combo Pack (154905); Stampin’ Write Marker Assortment Neutrals-Basic Gray (147158); Tasteful Labels dies (152886); Blending Brushes (153611)
• Miscellaneous: Stampin’ Dimensionals (104430); Mini Stampin’ Dimensionals (144108); Stampin’ Seal (152813); Brushed Metallic Adhesive Backed Dots (156506)


Measurements:


• Basic Gray cardstock: 8 ½” x 5 ½” (score at 4 ¼”); scrap for die cutting
• Bumblebee cardstock: 4” x 5 ¼”; 1” x 4”
• Gray Granite cardstock:  4” x 5 ¼”
• Misty Moonlight cardstock:  2” x 4”
• Basic White cardstock: 2 ¼” x 3 ¼”; scrap


Instructions:


1. Fold the larger piece of Basic Gray cardstock in half to create the card base.
2. Using a Stampin’ Cut & Emboss Machine, emboss the Gray Granite piece with the Hive 3D Embossing Folder.
3. Stick the large Bumblebee piece on the Basic Gray card base closer to the top leftcorner (approx. 1/16” from the top and left sides, and 1/8” from the bottom and right side). Stick the embossed Gray Granite piece closer to the bottom right corner (approx. 1/16” from the bottom and right edges), off set from the Bumblebee layer.
4. Stamp the HB2U from the Nuts & Bolts set all over the Misty Moonlight cardstock using Misty Moonlight ink. Stick the stamped Misty Moonlight piece right of center on the Gray Granite piece. Stick the small Bumblebee piece to the left of the Misty Moonlight piece, leaving a small gap between the pieces.
5. Lightly blend some Bumblebee ink on the Basic White piece. Then add some fine speckles by flicking the brush tip of a Basic Gray Stampin’ Write marker against the inside edge of the lid of the marker. Then lightly blend some Gray Granite inkalong parts of the edges of the white piece (not all the way around, just here and there).
6. Stamp the birthday sentiment from Handsomely Suited with Basic Gray ink at the top of the Basic White piece.
7. Using the pointy rectangle label from the Tasteful Labels dies, die cut it from a scrap of Basic Gray. You will only need the end, so don’t die cut the whole shape! Stick the die cut behind the Basic White piece where you stamped the sentiment so that a triangle shape sticks out.
8. On a scrap of Basic White, stamp the short chubby robot with Memento Ink. Colour it with Stampin’ Blends as follows, then fussy cut it out:
a. Start with Dark Smoky Slate to add shadows and colour the arms, legs and hands
b. Add another layer of shadow with the Dark Gray Granite Stampin’ Blends marker
c. Colour over the whole robot (except his eyes) with the Light Gray Granite Stampin’ Blends to fill him in and blend the shades of gray together.
d. Add some highlights with the Dark So Saffron Stampin’ Blends to give the robot a tarnished look.
9. Apply some Stampin’ Dimensionals (body) and Mini Stampin’ Dimensionals (cut in half and put on feet) to the back of the robot. Stick him over the Bumblebee blended ink on the Basic White piece.
10. Using Stampin’ Dimensionals, stick the Basic White piece left of center and overlapping the Bumblebee and Misty Moonlight pieces.
11. Finish the card off with three of the pewter Brushed Metallic Adhesive Backed Dots along the right side of the Basic White piece.


Continue Reading
No comments
Share: