Showing posts with label real red. Show all posts

Tuesday, 22 February 2022

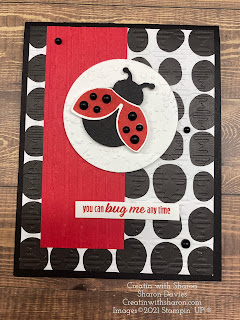
It's all About the Ladybug


Its's all about the Ladybug!


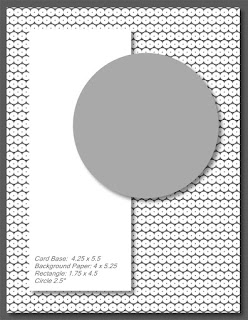
Here's the card sketch I did for my Facebook live. 
I did change it up for the live. I was wanting a Girlie card. 
So I did her in Polished Pink. 
You can definitely do it in any colour you wish. 


Here's the mesurement I used for the card. 
Easy Peasy!


Here's the Bits & Bobs and a video. 
Enjoy and please subscribe to my YouTube Channel. 


Thanks for stopping by. 

Cheers 

Sharon xoxo


Product List

Continue Reading
No comments
Share:

Saturday, 29 January 2022

Sweet Conversations

Sweet Conversations

All images © 1990-2022 Stampin’ Up!®


Supplies:


• Stamp Sets: Sweet Conversations (157618)
• Card Stock and Paper: Real Red Card Stock (CS) (102482)Basic White Card Stock (159276); Sweet Talk Designer Series Paper (DSP) (157616); 2021-2023 In Color Shimmer Vellum (155616)
• Stamp Pads: Gorgeous Grape Classic Stampin’ Pad (147099)
• Tools: Bouquet of Love Hybrid Embossing Folder (157641)
• Miscellaneous: Gorgeous Grape 3/8” Sheer Ribbon (154572); Iridescent Rhinestones Basic Jewels (158130); Stampin’ Dimensionals (104430)Stampin’ Seal Adhesive (152813); Mini Glue Dots (103683)


Measurements:


• Real Red CS: 8 1/2” x 4 1/4; score on the long side at 4 ¼”
• Real Red CS: 3” x 3” (scrap)
• Basic White CS: 1 ½” x 3” (scrap)
• DSP: 4” x 4”
• Ribbon: 10”


Instructions:


1. Die cut large heart from Real Red CS scrap and then emboss using Hybrid folder
2. Stamp sentiment onto Basic White scrap in Gorgeous Grape Classic Ink and die cut using label in Hybrid set
3. Die cut 3 small flowers from Fresh Freesia 2021-2023 In Color Shimmer Vellum
4. Layer DSP onto card front
5. Adhere Gorgeous Grape ribbon behind die cut heart using Mini Glue Dots and add layer to card front using Stampin’ Dimensionals
6. Adhere sentiment and shimmer flowers to card front using Mini Glue Dots
7. Add Iridescent Rhinestones to shimmer flowers


Continue Reading
No comments
Share:

Monday, 24 January 2022

Nuts & Bolts


Nuts & Bolts

All images © 1990-2022 Stampin’ Up!®


Supplies:


• Stamp Sets: Nuts & Bolts (157650)
• Card Stock and Paper: Basic White (159276); Basic Black (121045); Real Red (102482); Pattern Party (Hostess) Designer Series Paper (155426)
• Stamp Pads: Real Red (147084); Memento Tuxedo Black (132708)
• Tools: Layering Circles Dies (151770); Bouquet  of Love Dies (157641); Stampin’ Cut & Emboss Machine (149653); Paper Snips (103579)
• Miscellaneous: Stampin’ Dimensionals(104430); Stampin Blends Combo packs in Smoky Slate (154904); Playful Pets Trim Combo Pack (152466); Stampin’ Seal Adhesive (152813); Classic Matte Dots (158146); Mini Glue Dots (103683)


Measurements:


• Basic White8 ½ X 5 ½ scored at 4 ¼ and burnished with the Bone Folder, remainder of sheet for stamping and diecutting
• Basic Black: 3 ¾” x 5”
• Real Red:  1 ½” X 1 ½” scrap for heart
• Pattern Party Designer Series Paper (DSP): 3 ½” 4 ¾”


Instructions:


1. Attach DSP to Basic Black cardstock with Stampin’ Seal Adhesive and tie the red Playful Pets Trim into a bow around it.  Attach to card base with Stampin’ Seal Adhesive.
2. Cut largest circle and second to smallest circle from Basic White cardstock using the Layering Circles Dies and the Stampin’ Cut & Emboss Machine.  While you’reat it, cut heart using Real Red cardstock and the Bouquet of Love dies.
3. Stamp the robot image onto the large circle using Memento Tuxedo Black ink and color using the light and dark Smoky Slate Stampin’ Blends.
4. Stamp sentiment in Real Red ink onto the small circle. 
5. Attach both circles to card using Stampin’ Dimensional over the ribbon. 
6. Attach heart with Stampin’ Dimensionals and the black & white twine from the Playful Pets Trim using a Mini Glue Dot.
7. Add three white Classic Matte Dots to heart.

Continue Reading
No comments
Share:

Thursday, 13 January 2022

Hello Ladybug

Hello Ladybug

All images © 1990-2022 Stampin’ Up!®


Supplies:

• Stamp Set: Hello Ladybug (157693)
• Card Stock (CS) and Paper (DSP): Real Red CS (102482); Basic Black CS (121045)Bumblebee CS (153077)Garden Green CS (102584); Thick White CS (159229); Pattern Party Designer Series Paper (155426)
• Stamp Pads: Memento Black Ink (132708); Balmy Blue Classic Ink (147105)
• Tools: Ladybug Builder Punch (157698); Daisy Punch (143713); Layering Circles Dies (151770); White Stampin’ Chalk Marker (132133); Bone Folder (102300)
• Miscellaneous: Matte Black Dots (154284);Stampin’ Dimensionals (104430)Stampin’ Seal Adhesive (152813); Multipurpose Liquid Glue (110755)


Measurements:


• Thick White: 5-1/4” x 8”, scrap for 1-3/8” circle punch
• Basic Black: 4-1/4” x 5-1/2”, 2-1/4” x 5-1/4”, 1” x 3-1/2”, scraps for ladybug punch
• Real Redscraps for two ladybug wings punch
• Garden Green: scrap for ladybug wings punch
• Bumblebee: 2-3/4” x 5-1/2” for Daisy punches
• DSP: 2” x 5-1/4”


Instructions:


1. Score and fold the card base at 4” along the long side.
2. Glue card base in the center of a 4-1/4” x 5-1/2” Basic Black cardstock piece.
3. Stamp the tri-flower image in Balmy Blue ink on the middle right edge of the card front.
4. Glue the Gingham DSP to a 2-1/4” x 5-1/4” piece of Basic Black cardstock leaving a 1/8” border on the left and right.  Glue the DSP strip to the card front 3/8” from the card fold. Glue a 1” x 3-1/2” Basic Black cardstock strip horizontally to the card front 3/4” from the bottom edge and 1/4” from the left edge.
5. Punch out two Basic Black ladybug bodies, two Real Red and one Garden Greenladybug wings, two Bumblebee daisies, and one 1-3/8” Thick White circle. 
6. Stamp the two Real Red ladybug wings with dot image in Memento Black ink.  Glue one set of wings to each of the Basic Black ladybug bodies.  Add highlights to the ladybugs with a White Stampin’ Chalk Marker.
7. Slightly curl under the bottom of each Daisy petal by lightly scraping each petal outwards over a bone folder. Glue one daisy on top of the other using a Stampin’ Dimensional, rotating the top daisy slightly to create a full flower look . Mount the daisy to the front of the card centered in the Basic Black cardstock horizontal strip using Stampin’ Dimensionals.  Glue the Garden Green ladybug wings slightly under the left side of the daisy to create leaves using Multipurpose Liquid Glue.
8. Stamp a 1-3/8” Thick White cardstock circle with sentiment in Memento Black ink. Glue to the center of the Daisy punches using Multipurpose Liquid Glue.
9. Mount the cardstock ladybugs to the card front using Stampin’ Dimensionals.  
10. Randomly place one large and four small Black Matte Dots around the ladybugs on the front of the card.  


Continue Reading
No comments
Share:

Sunday, 2 January 2022

Happy Valentines Day.💕


Sweet Conversations Card

All images © 1990-2022 Stampin’ Up!®


Supplies:

• Stamps: Sweet Conversations (157618)
• Card Stock and Paper: Sweet Talk Designer Series Paper (157616); Basic White Cardstock(159276); Blushing Bride Cardstock (131198)
• Stamp Pads: Real Red Classic Stampin’ Pad(147084); Blushing Bride Classic Stampin’ Pad (147100)
• Miscellaneous: Real Red 3/8” Faux Linen Ribbon (158129); Iridescent Rhinestone Basic Jewels (158130); Paper Snips Scissors (103579); Stampin’ Dimensionals (104430); Multipurpose Liquid Glue (110755)


Measurements:


• Blushing Bride Card Base: 5 ½” x 8 ½” scored at 4 ¼”
• Sweet Talk Designer Series Paper: 1” x 3 ¾” 
(2 pieces)
• Basic White Cardstock: 2 ¼” x 3 ¾” 
• Blushing Bride Cardstock: 3” x 3/8”
• Scrap Basic White Cardstock for stamping middle heart
• Real Red 3/8” Faux Linen Ribbon: 8” long


Instructions:


1. Stamp the filled in heart with Real Red ink three times across the piece of Basic White card stock
2. Align the two pieces of Sweet Talk Designer Series Paper and the stamped piece of Basic White card stock onto the Blushing Bride card base
3. Starting with the bottom piece, adhere the two pieces of Sweet Talk Designer Series Paper with Stampin’ Seal and the middle Basic White card stock with Stampin’ Dimensionals
4. Stamp the Valentine’s Day sentiment using Real Red ink onto the smaller piece of Blushing Bride card stock.  Adhere to the card base with Multipurpose Liquid Glue
5. On the scrap piece of Basic White card stock, stamp the UR Cute sentiment with Blushing Bride ink and cut out with Paper Snips scissors.  Add to the card base with Stampin’ Dimensionals
6. Tie the piece of Real Red ribbon into a bow and adhere to the card base with Multipurpose Liquid Glue
7. Embellish with Iridescent Rhinestone Basic Jewels!

Continue Reading
No comments
Share:

Monday, 13 December 2021

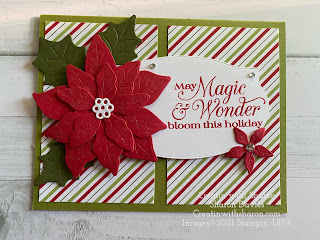
Poinsettia Petals

                                                     
Poinsettia Petals


Bits and Bobs
Base 5 1/2” x 8 1/2” scored on the long side at 4 1/4”.
DSP is 2 1/2” x 4 “ you’ll need two of these. 
Sentiment piece 2 1/4” x 1 1/2” you’ll stamp your sentiment with matching colour. I used Real Red.
Scraps of Real Red card stock for the Poinsettia.
Scraps of Mossy Meadow for the leaves. 

It wouldn’t be one of my cards with some bling! So I coloured the Poinsettia with my Wink of Stella and added a few Rhinestones. 

Thank you for stopping my.,
Have a wonderful day.
Stay save! 
Cheers 🍻 
Sharon
Xoxo 


 Product List


center>

Continue Reading
No comments
Share: