Showing posts with label vellum. Show all posts

Tuesday, 1 February 2022

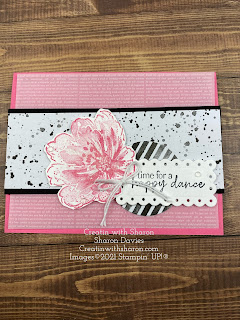
Flowing Flowers Card 3


 SUPPLY LIST
Stamps: 157880 Flowing Flowers
Paper: 158039 Abstract Beauty Designer Series Paper, 159276 Basic White Cardstock, 153080 Polished Pink Cardstock, Basic Black Cardstock, 158068 Supple Shimmer Specialty Paper, 157764 Vellum Layering Designs
Ink: 132708 Memento Ink Pad, 153117 Polished Pink Ink Pad
Embellishments: 155475 Baker’s Twine Essentials Pack, 158134 Polished Dots, 104430 Stampin' Dimensionals, 103683 Mini Glue Dots
Tools: 149653 Stampin’ Cut & Emboss Machine, 151770 Layering Circles Dies, 155560 Scalloped Contours Dies, 103579 Paper Snips Scissors
DIRECTIONS
1. Cut Polished Pink Cardstock to 8-1⁄2” x 5-1⁄2” and fold in half.
2. Cut Vellum to 5-1⁄4” x 4” and attach to card base (adding adhesive only to the middle section).
3. Cut Designer Series Paper to 5-1⁄2” x 2” and layer on Basic Black Cardstock cut to 5-1⁄2” x 2-1⁄4”.
4. Cut Supple Shimmer Specialty Paper to 5-1⁄2” x 1”, layer behind Basic Black and attach panel to Vellum
layer.
5. Die-cut circle from Designer Series Paper with Layering Circles Dies and attach to panel. (USE the circle left
over from card #1)
6. Die-cut label from Basic White Cardstock with Scalloped Contours Dies, stamp sentiment in Memento and
attach to card with Dimensionals.
7. Stamp flower on Basic White Cardstock in Polished Pink, cut out with Paper Snips and attach to card with
Dimensionals.
8. Tie a double bow of Basic White Twine and attach to flower with Mini Glue Dots.
9. Embellish card with Polished Dots.
Here’s the video 

Continue Reading
No comments
Share:

Tuesday, 16 February 2021

It’s Your Time to Shine

It’s Your Time to Shine     

I was doing some homework and found some interesting information about the Daisy. I had no idea.


Daisies symbolize innocence and purity. ... In Norse mythology, the daisy is Freya's sacred flower. Freya is thegoddess of love, beauty, and fertility, and as such the daisy came by symbolize childbirth, motherhood, and new beginnings. Daisies are sometimes given to congratulate new mothers.


 Cutting Instructions

Cardstock

Granny Apple Green 5 ½” x 8 ½” Card base

Basic White 4 ¾” x 3 ½ “ Card inside – second layer

Scrap Sentiment and daisies


Designer Series Paper

Flower and Field 4 ¾” x 3 5/8” Card front – first layer

4” x 5 ¼” Card inside – first layer

Vellum 4 ½” x 3 3/8” Card front – second layer


Assembly Instructions

Card base

1. Fold the card base in half and burnish with your bone folder.

2. Adhere the smaller piece of DSP to the card front on an angle using your choice of adhesive.

Daisies

3. Using the large daisy from the Daisy Lane Cling Stamp Set, ink the stamp with Versamark ink and then, before stamping, ink it again using Tuxedo Memento ink.

4. Stamp the daisy onto a scrap of Basic White cardstock.  Hold for a few seconds to ensure the ink and Versamark is applied well.

5. Apply Clear Stampin’ Emboss powder to the daisy and heat emboss with the Heat Tool.

6. Repeat this process for the second daisy.

7. When completely dry, colour both daisies using the dark Mango Melody Stampin’ Blend.

8. Punch out both daisies with the Daisy Punch and adhere on top of each other, offsetting the petals.  

9. Add Stampin’ Dimensionals to the back of the daisies and adhere to the Vellum, covering the adhesive on the back side of the Vellum.

10. Adhere the Vellum to the card front using Mini Glue Dots.

Sentiment

11. Using a scrap of Basic White, stamp the sentiment in Granny Apple Green and cut out with your scissors, leaving a thin border on all sides.

12. Using 2 or 3 Stampin’ Dimensionals, cut in half, adhere the sentiment to the card front.

13. Adhere a Basic Rhinestone Jewel to both ends of the sentiment.

Card inside


14. Adhere the larger piece of DSP to the inside of the card.

15. Take the other piece of Basic White cardstock and stamp the leaves in Old Olive ink and the flower in So Saffron ink.

16. Adhere this piece to the inside of the card.


Thanks so much for stopping by.


Cheers 🍻 

Sharon 

XOXO 


These are the Stampin’ Up! products I used for this project:


                                                                           Product List
Daisy Punch
[143713]
$24.00

Continue Reading
No comments
Share:

Tuesday, 16 July 2019

Floral Essence


Here’s my card for CASEing Tuesday 208.
So....what do you think of the colour combo?
I’m loving the Subtle colour family. And the new 6x6 DSP is Gorgeous.


The base is 5 1/2”x 8 1/2”  scored on the 8 1/2” at 41/4”
The DSP is 4”x 5 1/4”
I then embossed a piece of 3”x 5”vellum with the Subtle Embossing folder. Then on a piece of 
2 3/4”x 4” I stamped the flowers in Blushing Bride ink. The centres are stamp in memento and the leaves in Pear Pizzaz. 
Add a few  sequins to finish it off. 

Thanks so much for stopping by. 
Keep on Creatin’
Product List

Continue Reading
1 comment
Share:

Thursday, 24 January 2019

Lovely Lace


Lovely Lace 

Don’t you just loving Free stuff!
This was such a fun card to make.


I used Highland Heather for the card base. Which is 11”x 4 1/4” scored at 5 1/2”
 Crumb cake is 5 1/4 x 4“ and with the basket weave embossing folder, you want to emboss with the folder and your Big Shot.
 Then I took the vellum card stock which is 3“ x 4“.   Using the embossing buddy run it over the vellum. This stops the static of the embossing powder . Then I stamped up the image from the Lovely Lace with versa mark.  And  stamped on the vellum.  With your white embossing powder sprinkle over the vellum and lightly tap the back to remove any excess powder. How grab your heating tool and run over the image until it turns shiny. Let the fun begin. Turn your image around. Why? So you don’t need to worry about going over the embossing lines. If you’re like me...I don’t like colouring outside the lines!  With your Blends  we want to colour the images. The leaves are granny apple green.  Daffodil Delight for the centre of the flowers. The flowers were coloured with Highland Heather, Calypso Coral and the Flirty Flamingo. Then I fussy cut the image out.  And adhere to the Crumb Cake with mini dimensionals. 

Wanting to Thank You so much for stopping by.
Have yourself a wonderful day 💕
You can check out my video on my Facebook page 
Facebook.com/creatinwithsharon


Product List

Continue Reading
No comments
Share:

Tuesday, 8 May 2018

CASE-ing Tuesday #146 Birthday Blooms

 What a coincidence!
 This weeks CASE-ing card and technique we’re using for club uses the same stamp!
 Sad part about this is the stamp is retiring.
At club I like to teach the girls different techniques. So this month it’s all about the vellum.
The girls are going to learn how to heat emboss onto vellum, which I’ve done here. Along with embossing with a embossing folder and big shot. And using vellum as an accent. 
Here’s hoping they enjoy the techniques. 
Wanting to see how I did this Technique. I’ll be doing a Facebook live on Wednesday May 9 at 3 pm central time on my Facebook page.
Facebook.com./creatinwithsharon
Hoping to see ya then. 
Here’s the products I used.


Continue Reading
No comments
Share: