Showing posts with label coastal cabana. Show all posts

Monday, 21 March 2022

For the Record

For the Record Card

All images © 1990-2021 Stampin’ Up!®


Supplies:


• Stamp Sets: For the Record (158066)
• Card Stock and Paper:Basic White Thick (159229); Basic White (159276); Basic Black (121045); Coastal Cabana (131297)
• Stamp Pads: Coastal Cabana (147097);Polished Pink (155712); Tuxedo Black Memento (132708)
• Tools: Amazing Thanks Dies (157816)
• Miscellaneous: 2021-23 In Color Jewels (155571); Foam Adhesive Strips (141825); Stampin’ Dimensionals (104430); Stampin’ Seal Adhesive (152813)


Measurements:


• Basic White Thick: 8 1/2” x 5 1/2”
• Basic White: 4 ¾” x 3 ½”
• Basic Black: 5” x 3 ¾”, plus scraps
• Coastal Cabana: 4 7/8” x 3 5/8”


Instructions:


1. Score Basic White cardstock in half on long side and fold on score line.
2. Adhere Basic Black cardstock to card front using Dimensionals.
3. Adhere Coastal Cabana cardstock to card front using Dimensionals.
4. Stamp record player using Coastal Cabana, Tuxedo Black Memento, and Polished Pink Inks.
5. Place “thanks” die on stamped cardstock as shown, and die cut skinnier word thanks.
6. Adhere white cardstock that has “thanks” die cut out of it to card front.
7. Die cut Basic Black “thanks” die (larger outline die)  and adhere to card front using Foam Adhesive Strips to give it a pop.
8. Adhere white die cut “thanks” to black outline “thanks” on card front.
9. Adhere 2 In Color Jewels to center of record player.
Continue Reading
No comments
Share:

Monday, 10 January 2022

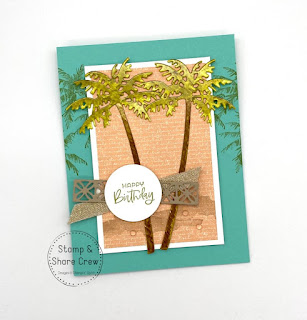
Paradise Palms Birthday

Paradise Palms

All images © 1990-2022 Stampin’ Up!®


Supplies:


• Stamp Sets: Paradise Palms (157716), Bundle with Palms Dies (157719) 
• Card Stock (CS) and Paper:Coastal Cabana (CS) (131297); Basic White (CS) (159276); Crumb Cake (CS) (120953); Artfully Composed Designer Series Paper (DSP) (157750); Mother of Pearl Specialty Designer Paper (157666)
• Stamp Pads: Old Olive (126953);Crumb Cake (126975)
• Tools: Palms Dies (157718); Layering Circle Dies (151770); Paper Snips (103579); Stampin’ Blends in Old Olive (154892) and Soft Suede (154906)
• Miscellaneous: Fine Art Ribbon (154561); Polished Dots (158134); Stampin’ Dimensionals (104430); Stampin’ Seal Adhesive (152813); Mini Glue Dots (103683)


Measurements:


• Coastal Cabana Cardstock: 4 ¼” x 11”
• Basic White Cardstock: 3” x 4 ½”, scrap approx. 2” x 2”
• Crumb Cake Cardstock: 6” x 1”
• Artfully Composed DSP: 2 ¾” x 4 ¼”
• Mother of Pearl Specialty Paper: approx. 4” x 5”
• Ribbon: 3 ½”


Instructions:


1. Score Coastal Cabana card base at 5 ½” on the long side. 
2. Stamp the top of one of the palm trees from the stamp set on the card base using Old Olive ink. Stamp on the edges of the upper left and right sides approx. 3 times on each side. 
3. Stamp the sand/ground image on the designer paper layer in Crumb Cake ink. Then, attach that DSP layer to the Basic White layer using Stampin’ SEAL adhesive. 
4. Pop that whole layer on the card front using Stampin’ Dimensionals. 
5. To make the trees: cut 2 trees from the Mother of Pearl Specialty Paper using the Palms Dies. Color the top of the trees with Old Olive Stampin’ Blends and the tree trunks using Soft Suede Stampin’ Blends. After the ink dries you can add a few more strokes of color to make it look shaded and to give the trees some texture. 
6. Add the trees to the card front using Mini Glue Dots. 
7. Die cut the decorative strip from the Palms Dies in Crumb Cake Cardstock. 
8. Add the piece of ribbon to the card front using Stampin’ SEAL. Then, add the decorative strip over the ribbon using Mini Glue Dots. I cut the decorative strip in the middle to make it shorter, so the ends looked nice, and the seam is under the sentiment. The length of the decorative border on the finished card is approx. 3”. 
9. Stamp the sentiment in Old Olive ink on Basic White cardstock and die cut using a small circle die. Add to the card front using Stampin’ Dimensionals. 
10. Lastly, add three Polished Dots in the “sand”. 


.


Continue Reading
No comments
Share:

Monday, 27 December 2021

Rainbow of Happiness

Rainbow of Happiness

All images © 1990-2021 Stampin’ Up!®


Supplies:


• Stamp Sets: Rainbow of Happiness (157721)
• Card Stock and Paper: Coastal Cabana Card Stock (CS) (131297); Magenta Madness CS(153080); Basic White CS (159276); Sunshine & Rainbows Designer Series Paper (DSP) (158126)
• Stamp Pads: Magenta Madness Classic Ink(153117)
• Miscellaneous: Baker’s Twine Essentials Pack(155475); Stampin’ Dimensionals (104430); Stampin’ Seal Adhesive (152813)


Measurements:


• Coastal Cabana CS: 8 1/2” x 5 1/2”, score at 4 ¼” on the long side
• Basic White CS: 3 1/2" x 4 1/2”
• Magenta Madness CS: 3 5/8” x 4 5/8”
• (3) DSP: 1” x 4 1/4”
• Basic White Baker’s Twine: 12”


Instructions:


1. Layer DSP strips onto Magenta Madness CS
2. Add this layer to the Basic White CS mat and wrap the Basic White Baker’s Twine around it; tie a bow.
3. Add this layer to the Coastal Cabana card base using Stampin’ Dimensionals
4. Fussy cut a rainbow and cloud image from the DSP and layer them onto your card front using Stampin’ Dimensionals
5. Stamp sentiment in Magenta Madness Classic Ink and fussy cut around phrase; layer onto card front


Continue Reading
No comments
Share:

Wednesday, 3 March 2021

In Bloom-Class To Go!


Introducing my new monthly Card Class-to-Go!!!  

Each month will feature a different Stampin’ UP! product.

March’s Class will feature - The In Bloom Bundle

We’ll be making 3 Beautiful cards using this Bundle.

Your kit will include the materials needed to create the cards-card bases, Precut embellishments, rhinestones etc.

Each kit will come with a PDF with directions & measurements for the cards so you can use the design over & over again. 


These classes can be shipped anywhere in Canada for a fun online crafting experience from the comfort of your own home.   Porch Pick Up will be available in Winnipeg for Class Kits or mailed via Canada Post (for additional $5.) 


Choose your class option:


Option 1  - Card kits & PDF Only


Order just the card kit and receive just the materials and  a PDF for the assembly of each project.

Note: Does not include the feature product of the month. You will use your own adhesives, inks & stamp sets to complete the sentiments!  

Cost:  $25


Option 2 - Card kits, In Blooms Stamp set, PDF & Online class.

The online class is via Zoom. On Saturday March 27 @ 10 am.

You will use your own adhesives, inks, etc

Cost: $35


Option 3 - Card kit, In Bloom Bundle (which includes the In Bloom Stamp set and the Pierced Blooms Dies), PDF & Live Online Class

You will use your own adhesives, inks, etc

Cost: $80


RSVP by March 13 to myself at sharic1@shaw.ca 


Continue Reading
No comments
Share:

Thursday, 17 October 2019

Snowman Season


Snowman Season
I must say the Snowman Season has to be my favourite Stamp Set fro the Holiday Catalogue. 
The Snowmen are so darn cute. And that Let it Snow Speciality Designer Series Paper...to die for. Right!  OH! The colours.... Basic Black, Blueberry Bushel, Coastal Cabana, Flirty Flamingo, Real Red, Shaded Spruce, Whisper White. Just a rainbow of colour. Love them! 
My favourite is the Real Red and Coastal Cabana. 
What’s your favourite colour combo?


Here’s how it’s made. 
Base is 5 1/2” x 8 1/2” scored on the longer side at 4 1/4”
The DSP is 3 3/4” x 5 “ 
I stamped the Snowman on a scrap paper and used an oval die to cut it out.
Grab a piece of Red Glimmer paper and cut it using one of the scalloped dies. 
My Merry Christmas is 3/4”x 3 5/8” 
The little strip of DSP is 3/4” x 2 5/8”

Any questions please let me know.
Thanks for stopping by. 

Cheers 🍻 
Sharon 
.


< Product List
center>

Continue Reading
No comments
Share:

Monday, 7 October 2019

LET IT SNOW

Let it Snow.
Thinking that’s what this little guy is wishing for. 
A quick and easy card to make. And I know it’s only October but here in Winnipeg it’s getting cool. And thinking that the snow with been flying real soon. 🥶


You’ll need a card base which is 8 1/4” x 5 1/2”. Scored in the 81/2” side at 4 1/4”
The Feels Like Frost is cut to 5 1/4”x 4” and adhered to the card base. 
Using your rectangle Stitched dies you want to cut two pieces. 
One in the coastal cabana and the other one the stamp your image on.
Now take your snowfall accent puff paint. Make sure you shake it really well. Add add some onto the whisper white card stock. Then heated up with your heat tool. I added a little of the ice Stampin glitter while it was still warm so it Would adhere.
No take your hat put a dimensional on the back of it put it on top of the snow pile. And take your branches in lightly tuck them in the snow.
Thanks for stopping by.
Cheers 🥂 

Product List

Continue Reading
No comments
Share: