Showing posts with label flowing flowers. Show all posts

Tuesday, 8 February 2022

Thank You

 Thank you! 

This is the card I did on my Facebook Live. And it’s also the 
Sketch for the CASE-ing Tuesday Challenge #342 this week. 
I must say that the  Flowing Flowers stamp set is my all time favourite. 
I love the font along with images. 
It’s also very easy to work with. 


 Here’s the Bits and Bobs for this card. 
Base 5 1/2”x 8 1/2” scored on the long side at 4 1/4”
Second layer is 5 1/4” x 4”
Third layer is 5” x 3 3/4”. This piece I embossed. 
The DSP stripes are 3/4” x 4 1/2”
The card stock stripes are 1“ x 3 1/2” and are embossed. 
The piece that the sentiment sits on is 3 1/2” x 2 1/4”
You want to stamp your image onto a scrap piece of Basic Card Stock. 
If you’re using the Flowing Flowers you will need to fussy cut the flower. 
To assemble refer to the photo. 

Be sure to leave a comment so I know you’ve stopped by. 
And thank you so much for doing so. 


Cheers 🍻 


Sharon Xoxo 


Continue Reading
No comments
Share:

Tuesday, 1 February 2022

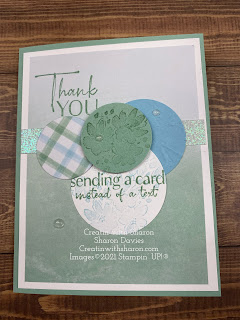
Flowing Flowers Card 4


Stamps: 157880 Flowing Flowers
Paper: 158039 Abstract Beauty Designer Series Paper, 159276 Basic White Cardstock, 153079 Mint Macaron Cardstock, 146982 Balmy Blue Cardstock, 158068 Supple Shimmer Specialty Paper
Ink: 153115 Mint Macaron Ink Pad, 147105 Balmy Blue Ink Pad
Embellishments: 158134 Polished Dots, 104430 Stampin' Dimensionals
Tools: 149653 Stampin’ Cut & Emboss Machine, 151770 Layering Circles Dies, 154317 Painted Texture 3D Embossing Folder
DIRECTIONS
1. Cut Mint Macaron Cardstock to 8-1⁄2” x 5-1⁄2” and fold in half.
2. Cut 2 pieces of Basic White Cardstock to 4” x 5-1⁄4”. Stamp flower in
Balmy Blue on 1 piece and attach to inside of card. Attach the other
piece to card front.
3. Cut Designer Series Paper to 3-3⁄4” x 5”, stamp sentiment in Mint
Macaron and attach to card front.
4. Cut Supple Shimmer Specialty Paper to 4” x 1⁄2” and attach to
Designer Series Paper.
5. Die-cut circles from Basic White Cardstock, Balmy Blue Cardstock, Mint
Macaron Cardstock and Designer Series Paper. Emboss Balmy Blue
circle with Painted Texture 3D Embossing Folder.
6. Stamp flower in Balmy Blue and sentiment in Mint Macaron on Basic
White Circle and layer circles on card front. Stamp flower in Mint
Macaron on Mint Macaron circle and attach with Dimensionals.
7. Embellish card with Polished Dots.
Here’s my video 

Continue Reading
No comments
Share:

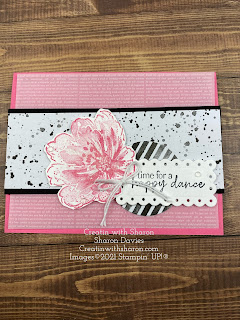
Flowing Flowers Card 3


 SUPPLY LIST
Stamps: 157880 Flowing Flowers
Paper: 158039 Abstract Beauty Designer Series Paper, 159276 Basic White Cardstock, 153080 Polished Pink Cardstock, Basic Black Cardstock, 158068 Supple Shimmer Specialty Paper, 157764 Vellum Layering Designs
Ink: 132708 Memento Ink Pad, 153117 Polished Pink Ink Pad
Embellishments: 155475 Baker’s Twine Essentials Pack, 158134 Polished Dots, 104430 Stampin' Dimensionals, 103683 Mini Glue Dots
Tools: 149653 Stampin’ Cut & Emboss Machine, 151770 Layering Circles Dies, 155560 Scalloped Contours Dies, 103579 Paper Snips Scissors
DIRECTIONS
1. Cut Polished Pink Cardstock to 8-1⁄2” x 5-1⁄2” and fold in half.
2. Cut Vellum to 5-1⁄4” x 4” and attach to card base (adding adhesive only to the middle section).
3. Cut Designer Series Paper to 5-1⁄2” x 2” and layer on Basic Black Cardstock cut to 5-1⁄2” x 2-1⁄4”.
4. Cut Supple Shimmer Specialty Paper to 5-1⁄2” x 1”, layer behind Basic Black and attach panel to Vellum
layer.
5. Die-cut circle from Designer Series Paper with Layering Circles Dies and attach to panel. (USE the circle left
over from card #1)
6. Die-cut label from Basic White Cardstock with Scalloped Contours Dies, stamp sentiment in Memento and
attach to card with Dimensionals.
7. Stamp flower on Basic White Cardstock in Polished Pink, cut out with Paper Snips and attach to card with
Dimensionals.
8. Tie a double bow of Basic White Twine and attach to flower with Mini Glue Dots.
9. Embellish card with Polished Dots.
Here’s the video 

Continue Reading
No comments
Share:

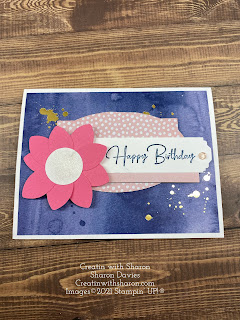
Flowing Flowers Card 2


SUPPLY LIST
Stamps: 157880 Flowing Flowers
Paper: 158039 Abstract Beauty Designer Series Paper, 159276 Basic White Cardstock, 159229 Basic White Thick Cardstock, 153080 Polished Pink Cardstock,
Ink: 147110 Misty Moonlight Ink Pad
Embellishments: 158140 Cotton Ribbon Combo Pack, 158134 Polished Dots, 104430 Stampin' Dimensionals, 103683 Mini Glue Dots
Tools: 149653 Stampin’ Cut & Emboss Machine, 153585 Hippo & Friends, 152883 Lovely Labels Pick A Punch, Ladybug Punch, 1” Circle Punch
DIRECTIONS
1. Cut Basic White Thick Cardstock to 8-1⁄2” x 5-1⁄2” and fold in half.
2. Cut Designer Series Paper to 5-1⁄4” x 4” and attach to card base.
3. Die-cut label from Designer Series Paper with Season Labels Dies and attach to card.
4. Cut a 1” strip of Basic White Cardstock and stamp sentiment in Misty Moonlight. Trim one end with Lovely
Labels Pick A Punch. Cut Designer Series Paper to 2” x 1”, layer behind sentiment and attach label to card
with Dimensionals.
5. Punch out 5 Wings of the Lady Bug and layer together to form the flower from Polished Pink Cardstock.
Punch out circle from Basic White Cardstock with 1” Circle Punch and layer on flower. Attach flower to
card with Dimensionals.
6. Tie a bow of Misty Moonlight Ribbon and attach to flower with Mini Glue Dots.

Here’s my video 


Continue Reading
No comments
Share:

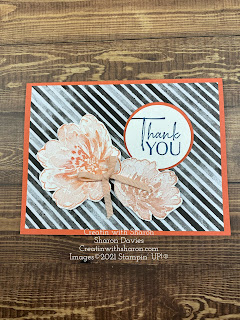
Flowing Flowers Card 1


SUPPLY LIST
Stamps: 157880 Flowing Flowers
Paper: 158039 Abstract Beauty Designer Series Paper, 159276 Basic White Cardstock, 119793 Calypso Coral Cardstock
Ink: 132708 Memento Ink Pad, 147050 Calypso Coral Ink Pad, 147108 Petal Pink Ink Pad
Embellishments: 158140 Cotton Ribbon Combo Pack, 158134 Polished Dots, 104430 Stampin' Dimensionals, 103683 Mini Glue Dots
Tools: 149653 Stampin’ Cut & Emboss Machine, 151770 Layering Circles Dies, 103579 Paper Snips Scissors
DIRECTIONS
1. Cut Calypso Coral Cardstock to 8-1⁄2” x 5-1⁄2” and fold in half.
2. Cut Designer Series Paper to 5-1⁄4” x 4” and Die Cut the 2 inch circle from the front. attach to card base.
3. Die-cut 1 3⁄4 inch circle from Basic White Cardstock with Layering Circle Dies. Stamp flowers in Petal Pink and
sentiment in Memento on Basic White circle. Layer in the circle.
4. Stamp flowers on Basic White Cardstock in Calypso Coral and Petal Pink, cut out with Paper Snips and
attach to card with Dimensionals.
5. Tie a double bow of Petal Pink Ribbon and attach to flower with Mini Glue Dots.
6. Cut Basic White Cardstock to 5” x 3-3⁄4” and stamp flowers in Petal Pink. Stamp sentiment in Calypso Coral
and attach to inside of card.
7. Embellish card front with Polished Dots.

Here’s the video for you.


Continue Reading
No comments
Share:

Sunday, 16 January 2022

Flowing Flowers


 Flowing Flowers

All images © 1990-2022 Stampin’ Up!®


Supplies:


• Stamp Sets: Flowing Flowers (157880)
• Card Stock and Paper: Basic White Cardstock (CS) (159276); Polished Pink CS (155710); In Color 2021-2023 6” x 6” Designer Series Paper (DSP) (155641)
• Stamp Pads: Balmy Blue Classic Stampin’ Pad (147105); Soft Succulent Classic Stampin’ Pad (155778); Polished Pink Classic Stampin’ Pad (155712)
• Tools: Stitched Rectangle Dies (151820); Stampin’ Cut & Emboss Machine (149653); Paper Trimmer (152392); Bone Folder (102300); Take Your Pick (144107); Silicone Craft Sheet (127853); Blending Brushes (153611); Clear Block E (118484); Simply Shammy (147042)
• Miscellaneous: Genial Gems (155500); Stampin’ Dimensionals (104430); Multipurpose Liquid Glue (110755)


Measurements:


• Basic White: 8 1/2” x 5 ½”; 5 3/8” x 4 1/8”; 4 ½” x 3”
• Polished Pink: 3 5/8” x 2 1/4”
• In Color 2021-2023 DSP: 5 1/4” x 5/8”; 5 ¼” X 1 7/8” 


Instructions:


1. Score and fold the 8 ½” x 5 ½” Basic White CS at 4 ¼” on the long side to create the card base. Burnish the fold line with the bone folder to create a crisp fold.
2. Use the Blending Brushes to apply Balmy Blue ink and Soft Succulent ink to the 5 3/8” x 4 1/8” Basic White CS. Start at the top with Balmy Blue and blend downward to the Soft Succulent. Overlap the two colors about 1 ½” from the bottom. Adhere to the card base with Multipurpose Liquid Glue.
3. Arrange and adhere the DSP strips to the card front.
4. Stamp the large flower from the Flowing Flowers with Polished Pink ink onto the 4 ½” x 3” Basic White CS and die cut with 3 ¾” x 2 3/8” Stitched Rectangle Die. Adhere this to the Polished Pink CS with Multipurpose Liquid Glue and embellish with the Genial Gems. Attach this piece to the card front with Stampin’ Dimensionals.


Continue Reading
No comments
Share:

Wednesday, 29 December 2021

Flowing Flowers


Flowing Flowers


Here's what I used. 


STAMPS  157880 - Flowing Flowers Cling Stamp Set

Card Stock 

100702 - Old Olive 8 1/2”x 5 1/2” and a scrape for label. 

159276 - Basic White 5 1/4”x 4”

INK

147087 - Crushed Curry Classic Stampin' Pad,

147090 - Old Olive Classic Stampin' Pad, 

155712 - Polished Pink Classic Stampin' Pad

TOOLS

133773-Sponge Daubers

110755-Multipurpose Liquid Glue

104430 - Stampin’ Dimensionals, 

153585 - Hippo & Friends Dies, 


TECHNIQUES:

• Fussy cutting 


The Bits and Bobs


Base 8 1/2"x 5 1/2" scored on the long side at 4 1/4"

First layer is 5 1/4"x 4"

Scrap of Basic White for stamping two sets of flowers which will be fussy cut. 

And a piece of Old Olive for cutting out. 


Here's the video on how I put it together. 

Enjoy!


Continue Reading
No comments
Share: