Showing posts with label Misty Moonlight. Show all posts

Wednesday, 9 March 2022

Nuts & Bolts Happy Birthday

Nuts & Bolts Happy Birthday

All images © 1990-2022 Stampin’ Up!®


Supplies:

• Stamp Sets: Nuts & Bolts (157650); Handsomely Suited (154444)
• Card Stock and Paper: Basic Gray (121044); Bumblebee (153077); Gray Granite (146983); Misty Moonlight (153081); Basic White (159276)
• Stamp Pads: Basic Gray Classic Stampin’ Pad (149165); Misty Moonlight Classic Stampin’ Pad (153118); Memento Ink (132708)
• Tools: Hive 3D Embossing Folder (157955); Paper Snips Scissors (103579); Gray Granite Stampin’ Blends Combo Pack (154886); Smoky Slate Stampin’ Blends Combo Pack (154904); So Saffron Stampin’ Blends Combo Pack (154905); Stampin’ Write Marker Assortment Neutrals-Basic Gray (147158); Tasteful Labels dies (152886); Blending Brushes (153611)
• Miscellaneous: Stampin’ Dimensionals (104430)Mini Stampin’ Dimensionals (144108); Stampin’ Seal (152813)Brushed Metallic Adhesive Backed Dots (156506)


Measurements:


• Basic Gray cardstock: 8 ½” x 5 ½” (score at 4 ¼”)scrap for die cutting
• Bumblebee cardstock: 4” x 5 ¼; 1” x 4”
• Gray Granite cardstock:  4” x 5 ¼
• Misty Moonlight cardstock:  2” x 4”
• Basic White cardstock: 2 ¼” x 3 ¼”; scrap


Instructions:


1. Fold the larger piece of Basic Gray cardstock in half to create the card base.
2. Using a Stampin’ Cut & Emboss Machine, emboss the Gray Granite piece with the Hive 3D Embossing Folder.
3. Stick the large Bumblebee piece on the Basic Gray card base closer to the top leftcorner (approx. 1/16” from the top and left sides, and 1/8” from the bottom and right side). Stick the embossed Gray Granite piece closer to the bottom right corner (approx. 1/16” from the bottom and right edges), off set from the Bumblebee layer.
4. Stamp the HB2U from the Nuts & Bolts set all over the Misty Moonlight cardstock using Misty Moonlight ink. Stick the stamped Misty Moonlight piece right of center on the Gray Granite piece. Stick the small Bumblebee piece to the left of the Misty Moonlight piece, leaving a small gap between the pieces.
5. Lightly blend some Bumblebee ink on the Basic White piece. Then add some fine speckles by flicking the brush tip of a Basic Gray Stampin’ Write marker against the inside edge of the lid of the marker. Then lightly blend some Gray Granite inkalong parts of the edges of the white piece (not all the way around, just here and there).
6. Stamp the birthday sentiment from Handsomely Suited with Basic Gray ink at the top of the Basic White piece.
7. Using the pointy rectangle label from the Tasteful Labels dies, die cut it from a scrap of Basic Gray. You will only need the end, so don’t die cut the whole shape! Stick the die cut behind the Basic White piece where you stamped the sentiment so that a triangle shape sticks out.
8. On a scrap of Basic White, stamp the short chubby robot with Memento Ink. Colour it with Stampin’ Blends as follows, then fussy cut it out:
a. Start with Dark Smoky Slate to add shadows and colour the arms, legs and hands
b. Add another layer of shadow with the Dark Gray Granite Stampin’ Blends marker
c. Colour over the whole robot (except his eyes) with the Light Gray Granite Stampin’ Blends to fill him in and blend the shades of gray together.
d. Add some highlights with the Dark So Saffron Stampin’ Blends to give the robot a tarnished look.
9. Apply some Stampin’ Dimensionals (body) and Mini Stampin’ Dimensionals (cut in half and put on feet) to the back of the robot. Stick him over the Bumblebee blended ink on the Basic White piece.
10. Using Stampin’ Dimensionals, stick the Basic White piece left of center and overlapping the Bumblebee and Misty Moonlight pieces.
11. Finish the card off with three of the pewter Brushed Metallic Adhesive Backed Dots along the right side of the Basic White piece.


Continue Reading
No comments
Share:

Tuesday, 8 March 2022

Just for You

Just for You.

When I saw the Ranunculus Romance stamp set I fell in love.
I see it as a romantic stamp set with the flowers, the hand written stamp,
and the Eiffel tower from Paris.
Totally romance from Paris. 


 Product List

Ranunculus Romance Cling Stamp Set (English)
$32.00
Stripes & Splatters 3 D Embossing Folders
$13.50
Misty Moonlight 8-1/2" X 11" Cardstock
$12.00
Night Of Navy 8-1/2" X 11" Cardstock
$12.00
Basic White 8 1/2" X 11" Cardstock
$13.25
Gold & Rose Gold 6" X 6" (15.2 X 15.2 Cm) Metallic Specialty Paper
$6.75
Misty Moonlight Classic Stampin' Pad
$10.25
Cherry Cobbler Stampin' Blends Combo Pack
$12.00
Rhinestone Basic Jewels
$6.75
Soft Suede Classic Stampin' Pad
$10.25
Stampin' Cut & Emboss Machine
$163.00
center>

Continue Reading
No comments
Share:

Thursday, 17 February 2022

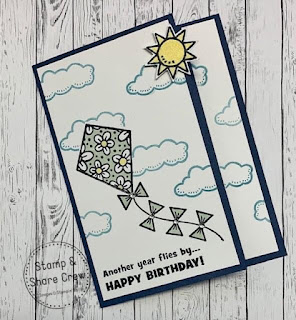
Kite Delight

Kite Delight

All images © 1990-2022 Stampin’ Up!®


Supplies:


• Stamp Sets: Kite Delight (157748)
• Card Stock and Paper: Misty Moonlight Cardstock (CS) (153081); Basic White CS (159276)
• Stamp Pads: Tuxedo Black Memento (132708); Balmy Blue (146982)
• Tools: Paper Snips Scissors (103579)
• MiscellaneousDaffodil Delight Stampin’ Blends (154883); Soft Sea Foam Stampin’ Blends (154902); Rhinestone Basic Jewels (144220)


Measurements:


• Misty Moonlight: 7 ½” x 5 ½” scored on long side at 3 ¼”
• Basic White: 5 ¼” x 3” for inside; 3 ¾” x 5 ¼” stamped then cut (see instructions); a 1 ½” square scrap


Instructions:


1. Score base at the 3 ¼” score mark
2. On the larger white piece stamp the sentiment and kit with Tuxedo Black Memento ink as shown.  Using a piece of post-it note paper – stamp and cut out a mask of just the kite.  Layer over the image on white, and stamp clouds with Balmy Blue as shown.
3. Cut a ¾” strip off the right side of this layer and adhere on the base inside all the way to the right on the inside portion of the base – it will show when closed.
4. On the portion that is left color the kite and tail bows with blends. Then adhere to the front panel of the card.
5. Stamp the sun on the scrap using Tuxedo Black Memento ink, color with Daffodil Delight blends and fussy cut.  Adhere at the upper left hand portion of the front with a dimensional – allowing it to overhang a bit.
6. Add a Rhinestone Basic Jewel to the center of each bow.
7. Adhere last white piece to inside left portion of the card – you can add an inside sentiment if desired.


Continue Reading
No comments
Share:

Wednesday, 2 February 2022

Amazing Silhouettes

Amazing Silhouettes

All images © 1990-2022 Stampin’ Up!®


Supplies:

• Stamp Sets: Amazing Silhouettes (157814)Bundle with Amazing Thanks Dies (157819)
• Card Stock (CS) and Paper:Smoky Slate (131202)Misty Moonlight (153081)Basic White (159276)Mother of Pearl Specialty Designer Series Paper (DSP) (157666)
• Stamp Pads: Smoky Slate(13117)
• Tools: Amazing Thanks Dies(157816)
• Miscellaneous: Stampin’ Blends in Balmy Blue (154830) and Misty Moonlight (153108); 1/8” Cotton Ribbon Combo Pack (158140); Mini Stampin’ Dimensionals (144108)Stampin’ SEAL Adhesive (152813); Mini Glue Dots (103683); Multipurpose Liquid Glue (110755)


Measurements:

• Smoky Slate Card Stock: 8 ½” x 5 ½”
• Misty Moonlight Card Stock: 5” x 3 1/8”
• Balmy Blue Card Stock7” x 1 ¼”
• Mother of Pearl Paper: 7” x 1 ¼”


Instructions:

1. Score Smoky Slate card base at 4 ¼” on the long side and fold in half. 
2. Stamp the tree image in Smoky Slate ink on the piece of Basic White Cardstock.
3. Attach the Misty Moonlight Cardstock piece to the back of the Basic White layer using Stampin’ SEAL. Then attach them to the card front a little to the right using Stampin’ SEAL.
4. Take your Mother Of Pearl paper piece and use your Stampin’ Blends to make horizontal scribble lines in an ombre fashion. I used the light Balmy Blue first then, dark Balmy Blue and lastly light Misty Moonlight. Don’t go over the colors to blend because it’s like a white board and it will erase the colors. Just add one color after the other (see photo at the end for my negative die-cut piece).
5. Die cut the piece of Mother of Pearl paper that you just colored using the “you are amazing” words. Then, die cut the outline of the words using Balmy Blue cardstock. 
6. Using liquid glue attach the words to the outline. Then, using Mini Stampin’ Dimensionals “pop” the sentiment up on the card front as shown. 
7. Add a small bow using the cotton ribbon in Misty Moonlight with a mini glue dot. 


Continue Reading
No comments
Share:

Thursday, 27 January 2022

New Horizon


The New Horizon Designer Series Paper is simply gorgeous!
As you can see there’s no Stampin on the image what so ever. 
I put this car together in a matter of minute. 
Super easy and perfect for the beginner stamper.,


Here’s the Bits and Bobs 
Base- 8 1/2“ x 5 1/2“ scored on the long side at 4 1/4 “
First layer is 4” x 5 1/4” and this piece is embossed. And glued to your card base. 
Cut your DSP into three strips One is 1 1/8”x 4” the next is 1” x 4” and the last one is  3/4”x4”
Adhesive them all onto a piece of card stock that’s 3 3/8”x 4 1/4”
I then ran the above piece through my stamping cut and boss machine using the stripes and splatters and Embossing holder. 
Stamped the sentiment onto a piece of scrap a basic white. With one of the dies from the Beautiful Shapes  cut it out and adhere to your card front using dimensionals.

Thanks so much for stopping by. 


Cheers 🍻 
Sharon Xoxo 


 Product List 

Continue Reading
No comments
Share:

Saturday, 15 January 2022

Rainbow of Happiness


Rainbow of Happiness

All images © 1990-2021 Stampin’ Up!®


Supplies:
• Stamp Sets: Rainbow of Happiness (157721);
• Card Stock and Paper: Bumblebee (CS) (153077); Basic White (CS) (1592760So Saffron (CS) (105118)Soft Sea Foam (CS) (146988); Balmy Blue (CS) 146982; Misty Moonlight (CS) (153081)
• Stamp Pads: Versamark Ink (102283);
• Tools: Brilliant Rainbow Dies (157726); Tasteful Texture Embossing Folder (152718)
• Miscellaneous: Stampin’ Emboss Powers Basic (155554); Heat Tool (129053); Paper Trimmer (152392); Paper Snips Scissors (103579); Adhesive Sheets (152334); Stampin’ Dimensionals (104430); Stampin’ Seal (152813); Stampin’ Cut & Emboss Machine (149653); Stampin’ Dimensionals (104430)Stampin’ Seal Adhesive (152813)

Measurements:

• Misty Moonlight: 8 ½  x 5 ½” Score at 4 ¼ ; 2 ¾ x ½ 
• Basic White: 3 7/8” x 1 ¼ (4)
• Bumblebee, So Saffron, Soft Sea Foam & Balm Blue: Scrap 3” x 3”
• So Saffron: 3 7/8” x ½ “

Instructions:

1. Cut a piece of Misty Moonlight 5 ½ “ x 8 ½ “ and score at 4 ¼ “ for the card base
2. Cut a piece of Basic White 3 7/8” x 5”
3. Cut a piece of Basic White 5 ½” x 4 ¼” and the adhere a large adhesive sheet to the back of it.  Die cut the large size cloud die from the Brilliant Rainbow die set. You need about 35 - 38 clouds. 
4. Randomly adhere the die cut clouds to the 3 7/8” x 5” piece of Basic White. When done cut four pieces out of the large piece. They will each be 1 ¼ “x 3 7/8”.
5. Adhere the four pieces of Basic White your created in step 4 to the card front as shown. Aligning the top and bottom piece to the top and bottom of the card base.
6. Die cut a rainbow out of Bumblebee, So Saffron, Soft Sea Foam and Balmy Blue. Use the adhesive sheets on the back of this paper if you wish.
7. Trace the rainbow die on Misty Moonlight and fussy cut out.
8. Adhere the individual (Bumblebee, So Saffron, Soft Sea Foam and Balmy Blue) rainbow pieces to the Misty Moonlight piece you fussy cut and adhere to front of card with Dimensionals. You will have extra rainbow pieces for another card or to decorate the inside and envelope. 
9. Die cut a few more clouds from Basic White and adhere to card base with Dimensionals or Stampin’ Seal.
10. Emboss the So Saffron piece with the Tasteful Textures embossing fold and adhere to card front with Stampin’ Seal. 
11. Stamp sentiment is Versamark ink and emboss with White embossing powder.
12. Cut a rectangle around the sentiment it should measure 2 ¾” x ½ “then adhere to card base with Dimensionals slightly overlaying the So Saffron piece above.


Continue Reading
No comments
Share: