Showing posts with label mint macaron. Show all posts

Tuesday, 29 March 2022

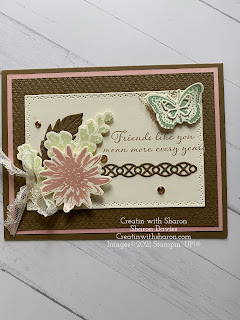
Friends Like You

The Positive Thoughts and Natures Thoughts dies are retiring. 

Which makes me sad as I do love these two products.

With them retiring they are while supplies last. 

So happy I have mine.


I used soft colours for this card. They work so well with the Soft Suede.

Totally loving the colour combo.

So what do you think of the sentiment?

I’m planning on using this card as a birthday card for a friend.

Hoping they like it. 


Here’s the Bits and Bobs 

Card Base- 8.5”x 5.5” scored at 4.25” on the long side.
First layer 5.25”x 4”
Second layer 5”x 3 3.75” 
You’ll need a piece to cut the rectangle from the dies set.
Scraps  for stamping the flower, greenery, and butterfly.           


Thanks so much for stopping by.,

Cheers 🍻 

Sharon
Xoxo 


You can check the YouTube video here...


center>

Continue Reading
No comments
Share:

Thursday, 24 March 2022

Artfully Layered

Artfully Layered

All images © 1990-2022 Stampin’ Up!®


Supplies:


• Stamp Sets: Artfully Layered (157752) or bundle with Tropical Layers Dies (157761)
• Dahlia Days (157799)

Card Stock and Paper: Pale Papaya Cardstock (155668)Crumb Cake Cardstock (120953); Mint Macaron Cardstock (138337); Very Vanilla Cardstock (101650); Artfully Composed Designer Series Paper (157750)
• Stamp Pads: Evening Evergreen (155576); Pale Papaya (155670); Crumb Cake (156975)
• Tools: Tropical Layers Dies (157760); Layering Circles Dies (151770); Greenery Embossing Folders (152716)
• Miscellaneous: Iridescent Rhinestones (158130);Stampin’ Dimensionals (104430)Stampin’ Seal Adhesive (152813)


Measurements:


• Card Stock 1: Pale Papaya- 4 ¼” x 11”
• Card Stock 2: Crumb Cake- 2 ½” x 5 ½”
• Card Stock 3Mint Macaron- 2 ¼” x 4”
• Card Stock 4: Very Vanilla- 2 ¼” x 2 ¼”
• Artfully Composed DSP: Dark Green for scalloped circle 2 ¼” x 2 ¼” and ¼” x 5 ½” strip in same pattern. Pale Papaya print for leaf 2 ¼” x 2 ¼”


Instructions:


1. Score card base on the long side at 5 ½” and fold. Stamp the leaf image from Artfully Layered in Pale Papaya on the card front two times in the lower lefthand corner and two times on the upper righthand corner. 
2. Emboss the Crumb Cake cardstock using the Greenery Embossing Folder then, open your Crumb Cake ink pad and drag it over the already embossed cardstock to highlight the embossed areas. 
3. Add the strip of dark green designer paper to the back of the embossed Crumb Cake layer with Stampin’ SEAL. Then, attach that panel to the card front. 
4. Die cut a leaf with the Pale Papaya designer paper pattern, a long leafy piece with Mint Macaron cardstock, a scalloped circle with the dark green designer paper pattern, and a circle using Very Vanilla cardstock
5. Attach the Pale Papaya and the Mint Macaron leaves to the card front with Stampin’ SEAL. 
6. Stamp your sentiment on the Very Vanilla circle and attach to the dark green scalloped circle. Then, pop it up over the leaves with Stampin’ Dimensionals. 
7. Lastly, add a few Iridescent Rhinestones to the card front.

Continue Reading
No comments
Share:

Tuesday, 1 February 2022

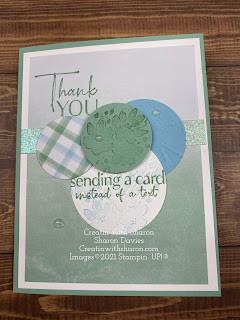
Flowing Flowers Card 4


Stamps: 157880 Flowing Flowers
Paper: 158039 Abstract Beauty Designer Series Paper, 159276 Basic White Cardstock, 153079 Mint Macaron Cardstock, 146982 Balmy Blue Cardstock, 158068 Supple Shimmer Specialty Paper
Ink: 153115 Mint Macaron Ink Pad, 147105 Balmy Blue Ink Pad
Embellishments: 158134 Polished Dots, 104430 Stampin' Dimensionals
Tools: 149653 Stampin’ Cut & Emboss Machine, 151770 Layering Circles Dies, 154317 Painted Texture 3D Embossing Folder
DIRECTIONS
1. Cut Mint Macaron Cardstock to 8-1⁄2” x 5-1⁄2” and fold in half.
2. Cut 2 pieces of Basic White Cardstock to 4” x 5-1⁄4”. Stamp flower in
Balmy Blue on 1 piece and attach to inside of card. Attach the other
piece to card front.
3. Cut Designer Series Paper to 3-3⁄4” x 5”, stamp sentiment in Mint
Macaron and attach to card front.
4. Cut Supple Shimmer Specialty Paper to 4” x 1⁄2” and attach to
Designer Series Paper.
5. Die-cut circles from Basic White Cardstock, Balmy Blue Cardstock, Mint
Macaron Cardstock and Designer Series Paper. Emboss Balmy Blue
circle with Painted Texture 3D Embossing Folder.
6. Stamp flower in Balmy Blue and sentiment in Mint Macaron on Basic
White Circle and layer circles on card front. Stamp flower in Mint
Macaron on Mint Macaron circle and attach with Dimensionals.
7. Embellish card with Polished Dots.
Here’s my video 

Continue Reading
No comments
Share:

Friday, 12 November 2021

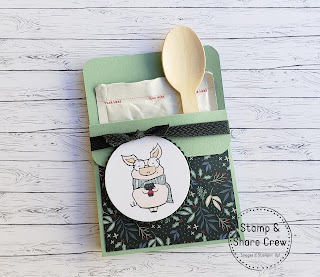
Joyful Life Hat Cocoa Holder

Joyful Life Hot Cocoa Holder


Check out this super cute card and easy holder. Perfect for that last minute gift giving, secret Santa or stocking stuffer.

Why not get the kids together and make an evening of it.

Oh what a fun night. 

You can purchase all of the products on my online store. 

Here’s the link. Happy Shopping 


https://www.stampinup.ca/?demoid=2103780


Supplies:


• Stamp Sets: Joyful Life Stamp Set(156529)
• Card Stock and Paper: Mint Macaron (138337); Basic White (159276)Evening Evergreen (155776)Tidings of Christmas Descriptive Designer Series Paper (DSP) (155718)
• Stamp Pads: Tuxedo Black Memento Ink (132708)
• Tools: Layering Circle Dies (151770); Detailed Trio Punch (146320); Ivory Stampin’ Blends (154922); Evening Evergreen Stampin’ Blends (155517); Soft Succulent Stampin’ Blends (155521); Real Red Stampin’ Blends (154899); Petal Pink Stampin’ Blends (154893)
• Miscellaneous: Evening Evergreen Chevron Weave Ribbon (155722); StampinDimensionals (104430)Stampin’ Seal Adhesive (152813); Tear & Tape Adhesive (154031)


Measurements:


• Mint Macaron: 4” x 11” scored @ 1 ¼”, 5”, & 5 ½” 
• Evening Evergreen: ½“ x 3 ½ “
• Basic White3 1/2” x 3 1/2” 
• DSP: ¾”  x 2 ¾”
• Ribbon: 6”, 4”


Instructions:


1. Die cut out of Basic White square a circle. Die cut one size bigger in the scallop circle shape the Evening Evergreen.
2. Stamp in Tuxedo Black Memento Ink the pig onto the Basic White circle. Color him with your Stampin’ Blends. Ivory for the nose and inside of the ears and Petal Pink for the pig’s skin. Scarf in Soft Succulent and hot cocoa cup in Evening Evergreen and Real Red. Glue to the Evening Evergreen scalloped circle.
3. Use the Detailed Trio Punch on all 4 corners of the Mint Macaron. 
4. Attach with the Stampin’ Seal Adhesive the DSP and use your Bone Folder to crease your score lines. 
5. Attach the ribbon with Tear & Tape on the other side of the 1 ¼ score line. Put the Hot Cocoa into the pocket. Then use a stapler to staple under the flap on both sides. Put the flap down to add the staples.  
6. Tie the 4-inch ribbon around the ribbon on the flap and make a knot bow. 
7. Put dimensionals on the back of the scalloped circle with the pig and attach just under the knot bow. 
8. Add the wooden spoon is optional and was bought off Amazon. 


Continue Reading
No comments
Share:

Monday, 17 August 2020

Boho Indigo tutorial

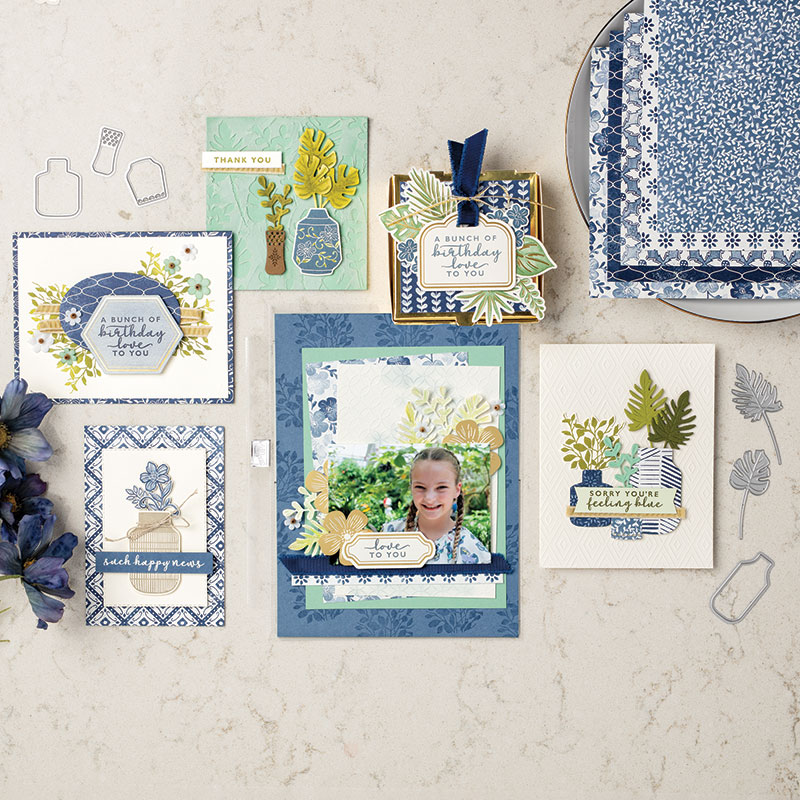
The Annual Catalogue Inspiration Boho Indigo Product Medley Do you ever have times you want to make something, but you just aren't sure where to start? It's the blank canvas dilemma of having too many choices. Often, when I'm not sure how to start, I let the artists at Stampin' Up! help me. Suites, kits, and medleys - oh my! These artist-designed sets of coordinating products are a great place to get your inspiration flowing. Start with a simple kit project and step it up. Or look for a colour combination, or a whole design theme. I hope this tip helps you the next time you are looking for inspiration! I'm sharing this elegant card tutorial with my newsletter subscribers featuring the Boho Indigo Product Medley. This gorgeous collection includes stamps, dies, paper, ribbon, die-cuts, and more! It's packed full of supplies that will inspire your creativity. In this tutorial you'll also learn how to create a masked Embossing Paste background. Escape the Ordinary...Come Create with Me

Sharon Davies
-------------------------------------------------- Boho Indigo Product Medley Boho Indigo Product Medley Boho Indigo Product Medley Boho Indigo Product Medley Boho Indigo Product Medley Masked Embossing Paste Card Masked Embossing Paste Card 
I get asked what the difference is between Suites, kits, and medleys? Although they are all groupings of coordinating products to make your crafting experience easier, there are a few difference. Suites are entire collections of themed products that coordinate. A suite has at least one stamp set, sometimes two and usually has patterned paper, dies or punches, ribbon, and embellishments. Kits include pre-designed and pre-cut projects. They can be all-inclusive or can include project supplies with coordinating stamps and ink available separately. Medleys are more like a mini-suite. They are a collection of coordinating supplies, but not as large as a suite, so you get a bit of everything to inspire your creativity at a budget-friendly price point. 
  Product List

:


 Join my Email Newsletter List and receive my tutorials by email. With each mailing you will receive a picture of the finished project, a supply list, card layout, and a step-by-step tutorial. VIEW MEDLEY ONLINE DOWNLOAD OUR LATEST CATALOGU Annual Catalogue

Continue Reading
No comments
Share:

Tuesday, 14 August 2018

CASE-ing Tuesday #160

Here’s my card for the week. 
Hard to believe I’m thinking of Christmas! 
I do love the Christmas season but it’s only the middle of August!
This month is bittersweet for me as summer is coming to an end and it’s my favourite season.
But the bright side my husband is coming home after being away for five month  on deployment. It’s going to be wonderful having him home.
I’m loving the colour combo. I don’t know about you but I get my inspiration from  just about anywhere. I was watching Sex and the City (love this series) and Carrie was wearing a outfit in 
this colour combo which I totally loved.
So off to the craft room I went. 
And this was what I came with.


Here’s the how to...
Card base is 8 1/2 x 5 1/2 scored on the 4 1/4 inches.
The Copper Foil Paper is 5 1/4 x 4 inches.   What you want to do now is take the framelit from the stitched  label frameless and cut it out using the copper foil. With a piece of min
T macaron that is cut at 5 x 3 3/4 that  using the copper foil. With a piece of mint macaron that is cut at 5 x 3 3/4. You want to emboss this piece using the tufted embossing folder.  With a scrap piece of Mint Macaron card stock cut it with a circular framelit from the stitched label framelits.  Stamp your sentiment using the verse Mark and sprinkle with the copper embossing powder and with your heat tool heated up. I love layers so I used  dimensionals om the copper foil  and   Adhered onto your tufted card stock and then dimension the sentiment onto the Copper Foil. 
Any questions please let me know. 
Thanks so much for stopping by.❤️
Here’s the list of what I used. 

 
Product List
Heat Tool
[129053]
$40.00
Big Shot
[143263]
$150.00

Continue Reading
No comments
Share: