Showing posts with label crumb cake. Show all posts

Sunday, 10 April 2022

Oceanfront

Oceanfront

All images © 1990-2021 Stampin’ Up!®


Supplies:


• Stamp Sets: Oceanfront (157862); Paradise Palms (157716); On the Horizon (157770)
• Card Stock and Paper: Crumb Cake (CS) (120953); Basic White (CS) (159276); Bermuda Bay (CS)(131197)
• Stamp Pads: Soft Suede (147115); Bermuda Bay (147096); Crumb Cake (147116); Pumpkin Pie (147086); Bumblebee (153116); Old Olive (147090); Sahara Sand (147117)
• Tools: Palm Dies (157718); Stitched Rectangles (151820); Tasteful Textures Embossing Folder (152718)
• Miscellaneous: Paper Trimmer (152392); Paper Snips Scissors (103579); Stampin’ Dimensionals (104430); Stampin’ Seal (152813); Stampin’ Cut & Emboss Machine (149653); Stampin’ Dimensionals (104430); Stampin’ Mini Dimensionals (144108); Stampin’ Seal Adhesive (152813)

Measurements:

• Crumb Cake: 8 1/2” x 5 1/2”
• Basic White; 5 ¼” x 4”; Scrap 3 ¼” x 4 ¾” & 4” x 4”
• Bermuda Bay: 3 ¼” x 4 ½” 

Instructions:

1. Cut a piece of Crumb Cake cardstock 5 ½” x 8 ½” and score at 4 ¼” for the card base
2. Cut a piece of Basic White cardstock 4” x 5 ¼” and emboss with Tasteful Textures Embossing folder and adhere to card base
3. Cut a piece of Bermuda Bay cardstock 3 ¼” x 4 ½” and adhere to card base with Stampin Dimensionals
4. Die cut a large Stitched Rectangle out of Basic White cardstock
5. Stamp on Basis White cardstock stitched rectangle as follows:
1. Stamp sand in Sahara Sand
2. Stamp water in Bermuda Bay
3. Stamp sky first in Bumblebee and the ‘kiss’ stamp at the bottom with a small amount of Pumpkin Pie
4. Stamp birds in Soft Suede
5. Stamp grasses in Soft Suede
6. Adhere stamped stitched rectangle to Bermuda Bay card stock on card base
7. Stamp Stones in Crumb Cake and then fussy cut out and adhere with Dimensionals to Basic White stitched rectangle
8. Stamp trunk of Palm tree in Soft Suede and Palm leaves in Old Olive and die cut both then adhere to Basic White stamped stitched rectangle, popping up the leaves with Dimensionals.
9. Stamp sentiment in Soft Suede and then fussy cut out and adhere to stitched rectangle with Dimensionals.
 

Continue Reading
No comments
Share:

Tuesday, 29 March 2022

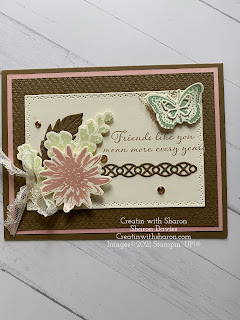
Friends Like You

The Positive Thoughts and Natures Thoughts dies are retiring. 

Which makes me sad as I do love these two products.

With them retiring they are while supplies last. 

So happy I have mine.


I used soft colours for this card. They work so well with the Soft Suede.

Totally loving the colour combo.

So what do you think of the sentiment?

I’m planning on using this card as a birthday card for a friend.

Hoping they like it. 


Here’s the Bits and Bobs 

Card Base- 8.5”x 5.5” scored at 4.25” on the long side.
First layer 5.25”x 4”
Second layer 5”x 3 3.75” 
You’ll need a piece to cut the rectangle from the dies set.
Scraps  for stamping the flower, greenery, and butterfly.           


Thanks so much for stopping by.,

Cheers 🍻 

Sharon
Xoxo 


You can check the YouTube video here...


center>

Continue Reading
No comments
Share:

Thursday, 24 March 2022

Artfully Layered

Artfully Layered

All images © 1990-2022 Stampin’ Up!®


Supplies:


• Stamp Sets: Artfully Layered (157752) or bundle with Tropical Layers Dies (157761); 
• Dahlia Days (157799)
•
Card Stock and Paper: Pale Papaya Cardstock (155668); Crumb Cake Cardstock (120953); Mint Macaron Cardstock (138337); Very Vanilla Cardstock (101650); Artfully Composed Designer Series Paper (157750)
• Stamp Pads: Evening Evergreen (155576); Pale Papaya (155670); Crumb Cake (156975)
• Tools: Tropical Layers Dies (157760); Layering Circles Dies (151770); Greenery Embossing Folders (152716)
• Miscellaneous: Iridescent Rhinestones (158130);Stampin’ Dimensionals (104430); Stampin’ Seal Adhesive (152813)


Measurements:


• Card Stock 1: Pale Papaya- 4 ¼” x 11”
• Card Stock 2: Crumb Cake- 2 ½” x 5 ½”
• Card Stock 3: Mint Macaron- 2 ¼” x 4”
• Card Stock 4: Very Vanilla- 2 ¼” x 2 ¼”
• Artfully Composed DSP: Dark Green for scalloped circle 2 ¼” x 2 ¼” and ¼” x 5 ½” strip in same pattern. Pale Papaya print for leaf 2 ¼” x 2 ¼”


Instructions:


1. Score card base on the long side at 5 ½” and fold. Stamp the leaf image from Artfully Layered in Pale Papaya on the card front two times in the lower lefthand corner and two times on the upper righthand corner. 
2. Emboss the Crumb Cake cardstock using the Greenery Embossing Folder then, open your Crumb Cake ink pad and drag it over the already embossed cardstock to highlight the embossed areas. 
3. Add the strip of dark green designer paper to the back of the embossed Crumb Cake layer with Stampin’ SEAL. Then, attach that panel to the card front. 
4. Die cut a leaf with the Pale Papaya designer paper pattern, a long leafy piece with Mint Macaron cardstock, a scalloped circle with the dark green designer paper pattern, and a circle using Very Vanilla cardstock. 
5. Attach the Pale Papaya and the Mint Macaron leaves to the card front with Stampin’ SEAL. 
6. Stamp your sentiment on the Very Vanilla circle and attach to the dark green scalloped circle. Then, pop it up over the leaves with Stampin’ Dimensionals. 
7. Lastly, add a few Iridescent Rhinestones to the card front.

Continue Reading
No comments
Share:

Tuesday, 15 February 2022

Let’s Set Sail

Let’s Set Sail

All images © 1990-2022 Stampin’ Up!®


Supplies:


• Stamp Set: Let’s Set Sail (157900) or discounted as a bundle with the Sailboat Builder Punch (157906)
• Card Stock and Paper: Crumb Cake(120953); Early Espresso (119686); Basic White (159276); Daffodil Delight (119683); So Saffron (105118); Granny Apple Green (146990)
• Stamp Pads:  Early Espresso Classic Stampin' Pad (147114); Coastal Cabana Classic Stampin' Pad (147097); Pool Party Classic Stampin' Pad (147107)
• Tools: Horizon Dies (157778); Tasteful Labels Dies (152886); Sailboat Builder Punch (157905) or discounted as a bundle with the Let’s Set Sail Stamp Set (157906); Mini Stampin’ Cut & Emboss Die Cutting Machine (150673)
• Miscellaneous: Rhinestone Waves Basic Jewels (159396)); Bakers Twine Essentials Pack (155475); Stampin’ Dimensionals (104430); Stampin’ Seal Adhesive (152813); Mini Glue Dots (103683); Fine Tip Glue Pen (138309)


Measurements:


• Crumb Cake: 5 1/2" x 8 1/2" scored at 4 1/4"
• Early Espresso: 5 1/4" x 4”
• Basic White:  5 1/8” x 3 7/8”


Instructions:


1. Adhere the Early Espresso layer to the Crumb Cake card base
2. Use the water stamp from Let’s Set Sail and Pool Party Ink to stamp the ‘sea’ four times, overlapping and staggering each one – for a muted look like mine, stamp ‘off’ each time on a piece of scrap paper before stamping on your cardstock
3. Use a die from Horizon Dies to cut the ‘sand’ from So Saffron cardstock and adhere – use the grass die and Granny Apple Green cardstock to create the dune grass and adhere in place.
4. Use the sand die again to cut out a piece of Daffodil Delight cardstock – trim to size and adhere onto the grass with Stampin’ Dimensionals
5. Die cut the fence out of Crumb Cake cardstock, add a bow and adhere in place
6. Stamp the sailboat using Early Espresso Ink and the sails using Coastal Cabana Ink – use the Sailboat Punch to cut out the pieces – glue the boat in place and add the sails with Stampin’ Dimensionals
7. Stamp the seagulls at the left top and stamp the sentiment onto a scrap piece of white cardstock using Early Espresso Ink– cut out using a die from Tasteful Labels Dies and add to the card with Dimensionals
8. Add some Rhinestone Jewels and adhere to the Espresso layer

Continue Reading
No comments
Share:

Friday, 14 January 2022

Amazing Silhouettes


Amazing Silhouettes

All images © 1990-2022 Stampin’ Up!®


Supplies:


Stamp Sets: Amazing Silhouettes (157814)
• Card Stock and Paper: Crumb Cake (120953), Basic White (159276), Early Espresso (119686)
• Stamp Pads: Versamark (102283), Sunshine & Rainbows DSP (158126)
• Tools: Heat Tool (129053), Stampin’ Emboss Powders Basics (155554), Layering Circle dies (151770), Painted Labels dies (151605), Stripes & Splatters 3D embossing folders (157980)
• Miscellaneous: Stampin’ Dimensionals(104430); Stampin’ Seal Adhesive (152813), Linen Thread (104199)


Measurements:


• Crumb Cake: 4 ¼” x 11”
• Crumb Cake: 1 ¾” x 4 ¼”
• Sunshine & Rainblows: ¾” x 4 ¼”
• Linen Thread:14”


Instructions:


1. Cut a 4 ¼” x 11” Crumb Cake card base. Fold in half.
2. Stamp the leaf image (3x) across the middle of the card front using Versamark ink.
3. Sprinkle the images with White embossing powder and heat set.
4. Cut a 1 ¾” x 4 ¼” piece of Crumb Cake cardstock.
5. Emboss using the Splatters embossing folder.
6. Wrap a 14” piece of Linen Thread (2x) around the cardstock and tie in a bow on the right side.
7. Adhere along the bottom of the card front.
8. Cut a ¾” x 4 ¼” piece of Soft Seafoam designer paper.
9. Adhere above the Splatter embossed cardstock.
10. Cut a swirl label from Basic White cardstock and adhere to the card front.
11. Stamp the sentiment onto a 2 ½” x 2 ½” (or scrap) piece of Early Espresso cardstock using Versamark ink.
12. Sprinkle with White embossing powder and heat set.
13. Cut using the 1 7/8” Layering Circle die.
14. Cut a 2” Layering Scallop Circle from a 2 ½” x 2 ½” (or scrap) piece of Basic White cardstock.
15. Adhere the circles together.
16. Adhere the circle to the label using Stampin’ Dimensionals.


Continue Reading
No comments
Share: