Showing posts with label Joyful life. Show all posts

Friday, 12 November 2021

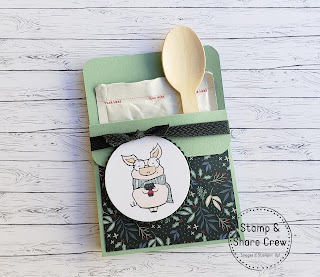
Joyful Life Hat Cocoa Holder

Joyful Life Hot Cocoa Holder


Check out this super cute card and easy holder. Perfect for that last minute gift giving, secret Santa or stocking stuffer.

Why not get the kids together and make an evening of it.

Oh what a fun night. 

You can purchase all of the products on my online store. 

Here’s the link. Happy Shopping 


https://www.stampinup.ca/?demoid=2103780


Supplies:


• Stamp Sets: Joyful Life Stamp Set(156529)
• Card Stock and Paper: Mint Macaron (138337); Basic White (159276)Evening Evergreen (155776)Tidings of Christmas Descriptive Designer Series Paper (DSP) (155718)
• Stamp Pads: Tuxedo Black Memento Ink (132708)
• Tools: Layering Circle Dies (151770); Detailed Trio Punch (146320); Ivory Stampin’ Blends (154922); Evening Evergreen Stampin’ Blends (155517); Soft Succulent Stampin’ Blends (155521); Real Red Stampin’ Blends (154899); Petal Pink Stampin’ Blends (154893)
• Miscellaneous: Evening Evergreen Chevron Weave Ribbon (155722); StampinDimensionals (104430)Stampin’ Seal Adhesive (152813); Tear & Tape Adhesive (154031)


Measurements:


• Mint Macaron: 4” x 11” scored @ 1 ¼”, 5”, & 5 ½” 
• Evening Evergreen: ½“ x 3 ½ “
• Basic White3 1/2” x 3 1/2” 
• DSP: ¾”  x 2 ¾”
• Ribbon: 6”, 4”


Instructions:


1. Die cut out of Basic White square a circle. Die cut one size bigger in the scallop circle shape the Evening Evergreen.
2. Stamp in Tuxedo Black Memento Ink the pig onto the Basic White circle. Color him with your Stampin’ Blends. Ivory for the nose and inside of the ears and Petal Pink for the pig’s skin. Scarf in Soft Succulent and hot cocoa cup in Evening Evergreen and Real Red. Glue to the Evening Evergreen scalloped circle.
3. Use the Detailed Trio Punch on all 4 corners of the Mint Macaron. 
4. Attach with the Stampin’ Seal Adhesive the DSP and use your Bone Folder to crease your score lines. 
5. Attach the ribbon with Tear & Tape on the other side of the 1 ¼ score line. Put the Hot Cocoa into the pocket. Then use a stapler to staple under the flap on both sides. Put the flap down to add the staples.  
6. Tie the 4-inch ribbon around the ribbon on the flap and make a knot bow. 
7. Put dimensionals on the back of the scalloped circle with the pig and attach just under the knot bow. 
8. Add the wooden spoon is optional and was bought off Amazon. 


Continue Reading
No comments
Share:

Thursday, 28 October 2021

Joyful Life


Love him and his glasses. He’s just so sweet of him to bring something hot. 

                   Oh and what could it be? Could it be coffee, tea or hot chocolate. 

I’m hoping it’s hot chocolate spiked with a little Bailey’s. 

And topped with whipped cream and shavings of chocolate


Joyful Life

All images © 1990-2021 Stampin’ Up!®


Supplies:

• Stamp Sets: Joyful Life (156529)
• Card Stock and Paper: Cherry Cobbler (119685); Basic White (159276); Tidings of Christmas Designer Series Paper (DSP) (155718)
• Stamp Pads: Early Espresso Classic Stampin’ Pad (147114)
• Tools: Brick & Mortar 3D Embossing Folder (149643); Stitched So Sweetly Dies (151690)Stampin’ Cut & Emboss Machine (149653); Paper Trimmer (152392); Bone Folder (102300); Paper Snips (103579); Take Your Pick Tool (144107)
• Miscellaneous: Cherry Cobblers & Gold ½” Ribbon (156312); Wonderful Gems (153536); Mini Stampin’ Dimensionals (144108); Stampin’ SEAL Adhesive (152813); Mini Glue Dots (103683); Wink of Stella Clear Glitter Brush (141897); Stampin’ Blends Combo Packs in Crumb Cake (154882); Dark Cherry Cobbler (154880); Light Smoky Slate (154904); Light Flirty Flamingo (154884); Dark Soft Succulent (155521); Ivory (154922); Color Lifter (144608)


Measurements:


• Cherry Cobbler: 8½” x 5½” (scored at 4½”)3” x 5½”
• Basic White3” x 2”(3 die cuts); ¾” x 2”
• DSP: 4¼” x 5½”
• Ribbon: 3½”


Instructions:


1. Stamp pig and sentiment using Early Espresso ink. Die cut pig using Stitched So Sweetly Dies. Color using Blends. Use Wink of Stella Clear Glitter Brush on pig’s glasses. Cut sentiment cardstock ends at an angle.
2. Adhere DSP to card front using Stampin’ SEAL Adhesive.
3. Emboss Cherry Cobbler (3” x 5½”) using Brick & Mortar 3D Embossing Folder. Adhere to card front using Stampin’ SEAL Adhesive.
4. Adhere pig/diecuts to card front. Adhere center diecut using Mini Stampin’ Dimensionals.
5. Adhere sentiment to card front using Mini Stampin’ Dimensionals.
6. Tie a knot in ribbon. Adhere to card front using a Mini Glue Dot.
7. Sprinkle three Wonderful Gems to card front using Take Your Pick Tool.

Continue Reading
No comments
Share: