Showing posts with label Bermuda Bay. Show all posts

Thursday, 14 April 2022

Crane of Fortune

Crane of Fortune

All images © 1990-2022 Stampin’ Up!
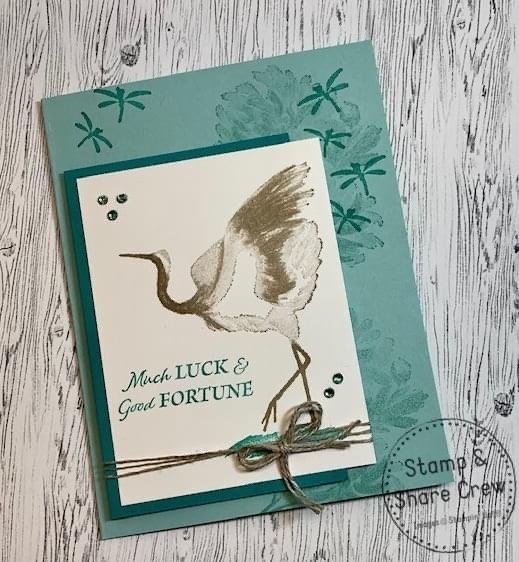


Supplies:


• Stamp Sets: Crane of Fortune (157654)
• Card Stock and Paper: Pool Party(122924); Bermuda Bay (131197); Basic White (159276)
• Stamp Pads: Pool Party (147107);Bermuda Bay (147096); Sahara Sand (147117)
• Miscellaneous: Linen Thread (104199);Rhinestone Basic Jewels (144220); Stampin’ Blends Combo Bermuda Bay (154878); Stampin’ Dimensionals(104430); Stampin’ Seal Adhesive (152813)


Measurements:


• Pool Party: 8 1/2” x 5 1/2” Base
• Bermuda Bay: 4 ¼” x 2 ¾”
• Basic White: 4” x 3”; 5 ¼” x 4” for inside
• Linen Thread – 16” to wrap and 12” to tie double bow


Instructions:


1. Score and fold base on the long side at 4 ¼”
2. Using Pool Party ink, stamp the large flower image two times along the right side of card front; and once in the bottom right corner of the inside Basic White layer.
3. Using Bermuda Bay ink, stamp the two dragonfly duos three times as shown on the card front; and once on the flower on the inside layer.
4. Stamp the Crane to the right side of the smaller Basic White layer using the Sahara Sand ink; then stamp the sentiment to the left of it with Bermuda Bay.  Layer this layer on the Bermuda Bay layer centering side to side; but leaving an even border on the left and the white hanging over on the right side.
5. Adhering the Linen Thread on the back wrap it three times around these; then tie a double bow with the 12” of Linen Thread and adhere to front as shown.
6. Pop this entire layer up on the base with Stampin’ Dimensionals over to the left side and nearer the bottom so Dragonflies show.
7. Color 5 small Rhinestone Basic Jewels with one of the Bermuda Bay Stampin’ Blends and add them to the cardfront.  
8. Place the larger stamped white layer centered on the inside to write on.


Continue Reading
No comments
Share:

Sunday, 10 April 2022

Oceanfront

Oceanfront

All images © 1990-2021 Stampin’ Up!®


Supplies:


• Stamp Sets: Oceanfront (157862); Paradise Palms (157716); On the Horizon (157770)
• Card Stock and Paper: Crumb Cake (CS) (120953); Basic White (CS) (159276); Bermuda Bay (CS)(131197)
• Stamp Pads: Soft Suede (147115); Bermuda Bay (147096); Crumb Cake (147116); Pumpkin Pie (147086); Bumblebee (153116); Old Olive (147090); Sahara Sand (147117)
• Tools: Palm Dies (157718); Stitched Rectangles (151820); Tasteful Textures Embossing Folder (152718)
• Miscellaneous: Paper Trimmer (152392); Paper Snips Scissors (103579); Stampin’ Dimensionals (104430); Stampin’ Seal (152813); Stampin’ Cut & Emboss Machine (149653); Stampin’ Dimensionals (104430); Stampin’ Mini Dimensionals (144108); Stampin’ Seal Adhesive (152813)

Measurements:

• Crumb Cake: 8 1/2” x 5 1/2”
• Basic White; 5 ¼” x 4”; Scrap 3 ¼” x 4 ¾” & 4” x 4”
• Bermuda Bay: 3 ¼” x 4 ½” 

Instructions:

1. Cut a piece of Crumb Cake cardstock 5 ½” x 8 ½” and score at 4 ¼” for the card base
2. Cut a piece of Basic White cardstock 4” x 5 ¼” and emboss with Tasteful Textures Embossing folder and adhere to card base
3. Cut a piece of Bermuda Bay cardstock 3 ¼” x 4 ½” and adhere to card base with Stampin Dimensionals
4. Die cut a large Stitched Rectangle out of Basic White cardstock
5. Stamp on Basis White cardstock stitched rectangle as follows:
1. Stamp sand in Sahara Sand
2. Stamp water in Bermuda Bay
3. Stamp sky first in Bumblebee and the ‘kiss’ stamp at the bottom with a small amount of Pumpkin Pie
4. Stamp birds in Soft Suede
5. Stamp grasses in Soft Suede
6. Adhere stamped stitched rectangle to Bermuda Bay card stock on card base
7. Stamp Stones in Crumb Cake and then fussy cut out and adhere with Dimensionals to Basic White stitched rectangle
8. Stamp trunk of Palm tree in Soft Suede and Palm leaves in Old Olive and die cut both then adhere to Basic White stamped stitched rectangle, popping up the leaves with Dimensionals.
9. Stamp sentiment in Soft Suede and then fussy cut out and adhere to stitched rectangle with Dimensionals.


Continue Reading
No comments
Share:

Friday, 28 January 2022

In the Moment

In the Moment

All images © 1990-2022 Stampin’ Up!®


Supplies:

• Stamp Sets: In the Moment (157987)
• Card Stock and Paper: Bermuda Bay (131197), Soft Suede (115318), Fluid 100 %” x 7” Watercolor Paper (149612), Simply Marbleous 6” x 6” Designer Series Paper “DSP” (158128 – free with a qualifying order January and February 2022)
• Stamp Pads: Misty Moonlight (153118), Bumblebee (153116), Bermuda Bay (147096), Old Olive (147090),Soft Suede (147115), Stazon Ink in Jet Black (101406) and Saddle Brown (151508)
• Tools: Paper Trimmer (152392), Paper Snips (103579), Bone Folder (102300)
• Miscellaneous: Water Painters (151298), Iridescent Rhinestone Basic Jewels (158130); Linen Thread (104199), Stampin’ Dimensionals (104430), Mini Stampin’ Dimensionals (144108), Stampin’ Seal (152813)


Measurements:

• Soft Suede card base: 5-1/2” x 8-1/2”, scored at 4-1/4” and burnished with the Bone Folder; 4” x 5-1/4”, 2” x 3/8”
• Bermuda Bay: 4” x 5-1/4”, 3-1/4” x 3-1/4”
• Designer Series Paper: 3-3/4” x 5”
• Watercolor Paper: 3” x 3”
• Thread: 36”


Instructions:

1. Stamp woman image onto Watercolor Paper with StazOn Jet Black. Using a Water Painter and ink that has pooled in the ink pad lid after you press the lid into it (then open), paint stamped image with Misty Moonlight, Bumblebee, Soft Suede, Old Olive, and Soft Suede. Set aside to dry.
2. Adhere a Bermuda Bay piece of the DSP to the Bermuda Bay cardstock with Stampin’ Seal. When Watercolor Paper piece is dry, adhere to Bermuda Bay layer then, using Wink of Stella Glitter Brush, paint in steam coming off the mug.
3. Wrap Linen Thread around DSP piece and tie bow on far left edge. Trim ends with Paper Snips.
4. Stamp sentiment on Soft Suede.
5. Adhere DSP piece to card base with Stampin’ Dimensionals then do the same with the woman image piece.
6. Adhere sentiment with Mini Stampin’ Dimensionals.
7. Align three Iridescent Rhinestone Basic Jewels to left of sentiment.

Continue Reading
No comments
Share:

Thursday, 6 January 2022

Awesome Otters

Awesome Otters

All images © 1990-2021 Stampin’ Up!®


Supplies:


• Stamp Sets: Awesome Otters (158087) (Sale-A-Brationset), Happiest of Birthdays (152539)
• Card Stock (CS) and Paper: Basic White (159276);Magenta Madness (153080), Bermuda Bay (131197), Sunshine & Rainbows Designer Series Paper (DSP) (158126) (Sale-A-Bration paper)
• Stamp Pads: Memento Tuxedo Black (132708), VersaMark (102283), Bermuda Bay (147096)
• Tools: Stitched Rectangles Dies (148551); Checks & Dots Embossing Folders (155432); Lovely Labels Pick A Punch (152883); Stampin’ Cut & Emboss Machine (149653); Stamparatus (146276), Bone Folder (102300); Paper Snips (103579); Paper Trimmer (152392)
• Miscellaneous: 2021-2023 In Color Jewels (155571); White ¼” Crinkled Seam Binding Ribbon (151326); Dark Magenta Madness Stampin’ Blends Marker (153106), Dark Bermuda Bay Stampin’ Blends Marker (154878), Light and Dark Crumb Cake Stampin’ Blends Markers (154882); Stampin’ Dimensionals (104430); Stampin’ Seal Adhesive (152813)


Measurements:


• Magenta Madness – 5 ½” x 8 ½”
• Bermuda Bay – 2 ¼” x 3 ½”
• Basic White – 4” x 5 ¼”; ½” x 2 ¾”, scrap for two otters/hats
• DSP: ​Dots Pattern – 1 ½” x 5 ½”

Stripes Pattern – 1” x 4 ¼” (cut 2)


Instructions:


1. Fold card base in half at 4 ¼” and burnish.  Using VersaMark ink, stamp hat over the entire front of card.
2. Attach 1” x 4 ¼” striped DSP approximately 1” up from the bottom of the card.
3. Attach the 1” x 5 ½” dots DSP approximately ¾” from the left side of the card.
4. Die cut the Bermuda Bay paper using the 2” x 3 ¼” Stitched Rectangle die.  Then emboss using the Checks Embossing Folder.  Attach to front of card as shown.
5. Stamp “It’s birthday time!” in Bermuda Bay ink on the ½” x 2 ¾” Basic White piece.  Punch the right side using the Lovely Labels Pick A Punch.
6. Attach to card using Dimensionals.
7. Use the Stamparatus to stamp the otter and his hat.  To align them, place the otter stamp on one Stamparatus plate so that the top of his head is right on one of the etched grid lines.  Stamp the otter using Memento Tuxedo Black ink onto grid paper to assist in the aligning process.  Remove plate and place the hat along the same grid line on a second plate.  Stamp the hat and adjust the stamp as needed to get the images aligned.
8. Once you have the images aligned, place scrap Basic White paper in the Stamparatus and stamp the otter and hat.  Repeat to make a second otter.  Fussy cut both otters out and color using Stampin’ Blends markers.
9. Attach one otter to the front of the card using Dimensionals.
10. Attach In Color Jewels as desired.
11. On the 4” x 5 ¼” Basic White piece, stamp “It’s your day” stamp in Bermuda Bay ink near the top.
12. Attach the 1” x 4” piece of striped DSP at the bottom.
13. Cut a 5” piece of the 3/8” White Crinkled Seam Binding and color using the dark Magenta Madness Blends Marker.
14. Place a piece of Tear & Tape just above the striped DSP and attach the Crinkled Seam Binding wrapping around the back to secure.
15. Attach otter to piece and then attach to inside of card.


Continue Reading
No comments
Share:

Saturday, 27 March 2021

You are Amazing


You are Amazing.

You definitely are! Thanks for stopping by. This is the second card we did in my In Bloom card class this morning.
I’m loving the colour combo. And so sad that the Pretty Peacock colour is retiring on May 2 2021. 
If find that the Pretty Peacock helps pop the Bermuda Bay, Daffodil Delight and Calypso Coral. 
A perfect card for anyone. 

Wanting the PDF for all three In Bloom cards?
                                Hit that shop button above and place an order of $40 in product 
                                                               using this Hostess Code QSBSWUGH
                                     and I’ll email you the PDF for all three of the In Bloom cards within 24 hours.


Thanks for stopping by. 
Stay safe and healthy.


Cheers 🍻 
Sharon 
XOXO

Product List 


center>

Continue Reading
No comments
Share: