
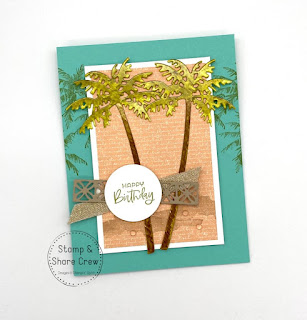
Paradise Palms
All images © 1990-2022 Stampin’ Up!®
Supplies:
• Stamp Sets: Paradise Palms (157716), Bundle with Palms Dies (157719)
• Card Stock (CS) and Paper:Coastal Cabana (CS) (131297); Basic White (CS) (159276); Crumb Cake (CS) (120953); Artfully Composed Designer Series Paper (DSP) (157750); Mother of Pearl Specialty Designer Paper (157666)
• Stamp Pads: Old Olive (126953);Crumb Cake (126975)
• Tools: Palms Dies (157718); Layering Circle Dies (151770); Paper Snips (103579); Stampin’ Blends in Old Olive (154892) and Soft Suede (154906)
• Miscellaneous: Fine Art Ribbon (154561); Polished Dots (158134); Stampin’ Dimensionals (104430); Stampin’ Seal Adhesive (152813); Mini Glue Dots (103683)
Measurements:
• Coastal Cabana Cardstock: 4 ¼” x 11”
• Basic White Cardstock: 3” x 4 ½”, scrap approx. 2” x 2”
• Crumb Cake Cardstock: 6” x 1”
• Artfully Composed DSP: 2 ¾” x 4 ¼”
• Mother of Pearl Specialty Paper: approx. 4” x 5”
• Ribbon: 3 ½”
Instructions:
1. Score Coastal Cabana card base at 5 ½” on the long side.
2. Stamp the top of one of the palm trees from the stamp set on the card base using Old Olive ink. Stamp on the edges of the upper left and right sides approx. 3 times on each side.
3. Stamp the sand/ground image on the designer paper layer in Crumb Cake ink. Then, attach that DSP layer to the Basic White layer using Stampin’ SEAL adhesive.
4. Pop that whole layer on the card front using Stampin’ Dimensionals.
5. To make the trees: cut 2 trees from the Mother of Pearl Specialty Paper using the Palms Dies. Color the top of the trees with Old Olive Stampin’ Blends and the tree trunks using Soft Suede Stampin’ Blends. After the ink dries you can add a few more strokes of color to make it look shaded and to give the trees some texture.
6. Add the trees to the card front using Mini Glue Dots.
7. Die cut the decorative strip from the Palms Dies in Crumb Cake Cardstock.
8. Add the piece of ribbon to the card front using Stampin’ SEAL. Then, add the decorative strip over the ribbon using Mini Glue Dots. I cut the decorative strip in the middle to make it shorter, so the ends looked nice, and the seam is under the sentiment. The length of the decorative border on the finished card is approx. 3”.
9. Stamp the sentiment in Old Olive ink on Basic White cardstock and die cut using a small circle die. Add to the card front using Stampin’ Dimensionals.
10. Lastly, add three Polished Dots in the “sand”.


.jpeg)
.jpeg)


No comments:
Post a Comment