Showing posts with label just jade. Show all posts

Friday, 18 March 2022

Cactus Cuties

Cactus Cuties

All images © 1990-2022 Stampin’ Up!®


Supplies:

• Stamp Sets: Cactus Cuties (158056)
• Card Stock and Paper: Evening EvergreenCard Stock (CS) (155574); Just Jade CS(153079); Basic White CS (159276); Artfully Composed Designer Series Paper (DSP) (157750)
• Stamp Pads: Evening Evergreen Classic Stampin’ Pad (155576); Just Jade Classic Stampin’ Pad (153115); Calypso Coral Classic Stampin’ Pad (147101); Polished Pink Classic Stampin’ Pad (155712)
• Tools: Beautiful Shapes Dies (158046); Cactus Builder Punch (158057)
• Miscellaneous: Adhesive-Backed Hexagons(158148); Stampin’ Dimensionals (104430); Stampin’ Seal Adhesive (152813)


Measurements:


• Evening Evergreen CS: 8 1/2” x 5 1/2” (score on the long side at 4 1/4")
• Just Jade CS: 4” x 5 1/4"
• Artfully Composed DSP: 2” x 5 ¼”
• Artfully Composed DSP: 3” x 3” (die cut shape)
• Basic White CS: 3” x 4” (stamp / punch cactus pieces)
• Basic White CS: 3/8” x 2 1/8” (sentiment)


Instructions:


1. Adhere Just Jade CS to card front
2. Adhere Artfully Composed DSP to card front
3. Stamp cactus images and punch out
4. Stamp sentiment
5. Die cut largest hexagon from Artfully Composed DSP square
6. Layer items onto card front using Stampin’ Dimensionals
7. Add black Adhesive-Backed Hexagons


Continue Reading
No comments
Share:

Tuesday, 15 March 2022

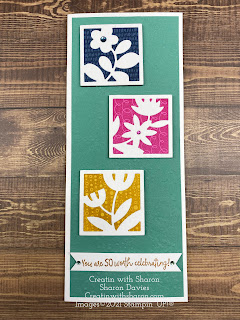
You are SO worth celebrating!


For this card I decided to use the soon to be retiring 2020-2022 In Colours. 
They are all so gorgeous I do hate to see them go. 
My favourite is the Misty Moonlight and Bumblebee and 
Just Jade….ok who am I kidding I love them all! 
Which one is your favourite? 


Check out how I made the card here


BITS and BOBS 
 Card Base- 7”x 8.5” scored on the short side at 3.5”
First layer is 8.25”x 3.25” this place I did emboss.
Cut out 3 of the flowers using the die from the set. I did mine in Basic White. 
I stamped three of the four square images onto coloured CardStock.
 You pick what you like. 
Adhere together as per the photo. 

Thank you for stopping by. Greatly appreciated.
Have a wonderful day and stay save! 

Cheers 🍻 

Sharon 
Xoxo 

                                                                       
Product List

Continue Reading
No comments
Share:

Wednesday, 8 July 2020

Thank You


Thank You.

This was my card for CASE-Ing Tuesday #259.
The layout is perfect for doing multiple cards. 
Love the layout of this card so much that I made 20 of them. 
That right 20 of these puppies. 
And I did them all in the New In Colours.


Here’s the bits and bobs for this card.
Base 8 1/2” x 5 1/2” scored on the 8 1/2 inch side at 4 1/4 inches. The next layer is 5 1/4 x 4“. Then the third layer is 5“ x 3 and three-quarter inches and I embossed this piece. Piece of the doily sits on is 3“x 3“ and the doily fits perfectly onto the 3”x 3”. I adhere it using a little bit of running tape. Your wanting to cut out the swirly piece and whisper white and then stamp your sentiment. 
Now adhere together. Super easy card to make. 
Can you can mass-produce sees in the matter of a hour. 
Thanks so much for stopping by greatly appreciate it. Have yourself  have a excellent day. Stay safe. Until  next week. 

Cheers Sharon🍻


Product List

Continue Reading
No comments
Share:

Monday, 29 June 2020

Lovely You

Lovely You
A super easy technique with the supplies you have.
Love how the colours pop on these card.
What I love  about this technique is that you can change up the colours to what ever you like.
You can check out the video on my Facebook.com/creatinwithsharon


Here’s the bit and bobs 

A card base 8 1/2” x 5 1/2” scored on the long side at 4 1/4” 
The next is 5 1/4” x 4”
And the third is 5” x 3 3/4”
 This is the piece that I coloured randomly with the inks listed below or you can choose your favourite colours. You can use a sponge or the blending brush to colour the card stock. Once you’ve coloured the card stock,  you’re gonna ink up your images with versa and stamp them onto the different colours. Be sure you stamp in odd numbers. Just to keep it aesthetically pleasing.
Sprinkle with the clear embossing powder. Warm up your heating tool and move over the embossed images until they’re set.
With a sponge ink up with the Memento and rub over the whole piece you just heat embossed.
With a piece of a paper towel rub the memento off of your clear embossed images.
Now to assemble your card.
With your liquid glue, glue the second piece of card stock onto your card base.
And now add your beautifully made DSP.
You’ll need a piece of card stock 1”x 4” and I punched it with with the Lovely Labels Punch.
The second piece for the sentiment is 1/2” x 3 1/2”  you’re going to stamp the sentiment with one of the colours you used .
 Thanks for stopping by greatly appreciate it have a wonderful week
Cheers🍻


Product List

Continue Reading
No comments
Share: