I'd love to hear what you think? You are more than welcome to comment below.
All images © 1990-2023 Stampin’ Up!®
Supplies:
Bundle: Marigold Moments (160667)Card stock: Night of Navy (100867); Petal Pink (146985); Basic White (159276)
Designer Series Paper: Regency Park 6" x 6" (160559)
Stamp Pads: Night of Navy (147110); Old Olive (147090); Garden Green (147089)
Embossing Folder: Basic 3D (161598)
Tools: Mini Stampin' Cut and Emboss Machine: (150673); Clear Wink of Stella (141897);
Embellishments: Adhesive Backed Milky Dots (160582)
Miscellaneous: Stampin' Dimensionals (104430); Multipurpose Liquid Glue (110755)
Check out how I put this card together in the video below. The card starts at time stamp 10:50.
Measurements:
Night of Navy: 8 1/2” x 5 1/2”, scored at 4 1/4" and a piece 3 3/4" x 5"
Petal Pink: 5 1/4" x 4”
Basic White: scraps for flowers, leaves and sentiment 1" x 3"
Designer Series Paper: 2 1/2" x 3 1/2"
Instructions:
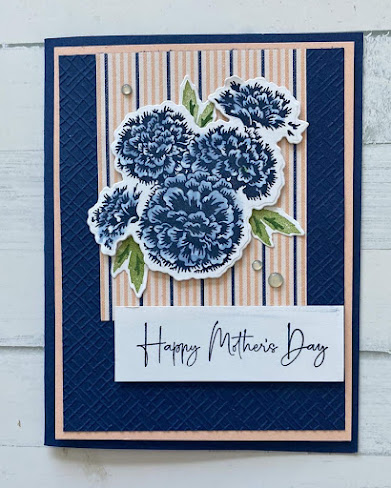
- Using the Mini Stamp and Cut Emboss Machine and the cross hatch embossing folder, emboss the smaller piece of Night of Navy card stock.
- Adhere this piece to the Petal Pink card stock using Multipurpose Liquid Glue.
- Adhere the piece of DSP to the top of the layer above. Centre as shown below.
- Stamp the marigold onto a scrap of Basic White card stock using Night of Navy ink. Use a piercing mat, if available.
- Stamp the three leaves in Old Olive ink and the small branches in Garden Green ink.
- Using the matching dies, cut out the marigold and 3 leaves.
- Color the marigold flower with the Wink of Stella pen to blend the lines of the stamp. The color will run which will enhance the image.
- Adhere the marigold as shown using Stampin' Dimensionals and adhere the leaves using Multipurpose Liquid Glue
- Stamp the sentiment in Night of Navy ink and adhere to the bottom using Stampin' Dimensionals.
- Adhere this whole piece to the card front using Stampin' Dimensionals.
Marigold Moments Bundle
Thank you so much for stopping by. I am so grateful that you did.
Don’t forget to leave a comment below.
Cheers 🍻
Sharon
Xoxo
Product List


.jpeg)

.jpeg)


No comments:
Post a Comment