Showing posts with label magenta madness. Show all posts

Tuesday, 15 March 2022

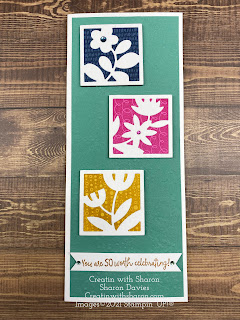
You are SO worth celebrating!


For this card I decided to use the soon to be retiring 2020-2022 In Colours. 
They are all so gorgeous I do hate to see them go. 
My favourite is the Misty Moonlight and Bumblebee and 
Just Jade….ok who am I kidding I love them all! 
Which one is your favourite? 


Check out how I made the card here


BITS and BOBS 
 Card Base- 7”x 8.5” scored on the short side at 3.5”
First layer is 8.25”x 3.25” this place I did emboss.
Cut out 3 of the flowers using the die from the set. I did mine in Basic White. 
I stamped three of the four square images onto coloured CardStock.
 You pick what you like. 
Adhere together as per the photo. 

Thank you for stopping by. Greatly appreciated.
Have a wonderful day and stay save! 

Cheers 🍻 

Sharon 
Xoxo 

                                                                       
Product List

Continue Reading
No comments
Share:

Thursday, 6 January 2022

Awesome Otters

Awesome Otters

All images © 1990-2021 Stampin’ Up!®


Supplies:


• Stamp Sets: Awesome Otters (158087) (Sale-A-Brationset), Happiest of Birthdays (152539)
• Card Stock (CS) and Paper: Basic White (159276);Magenta Madness (153080), Bermuda Bay (131197), Sunshine & Rainbows Designer Series Paper (DSP) (158126) (Sale-A-Bration paper)
• Stamp Pads: Memento Tuxedo Black (132708), VersaMark (102283), Bermuda Bay (147096)
• Tools: Stitched Rectangles Dies (148551); Checks & Dots Embossing Folders (155432); Lovely Labels Pick A Punch (152883); Stampin’ Cut & Emboss Machine (149653); Stamparatus (146276), Bone Folder (102300); Paper Snips (103579); Paper Trimmer (152392)
• Miscellaneous: 2021-2023 In Color Jewels (155571); White ¼” Crinkled Seam Binding Ribbon (151326); Dark Magenta Madness Stampin’ Blends Marker (153106), Dark Bermuda Bay Stampin’ Blends Marker (154878), Light and Dark Crumb Cake Stampin’ Blends Markers (154882); Stampin’ Dimensionals (104430)Stampin’ Seal Adhesive (152813)


Measurements:


• Magenta Madness – 5 ½” x 8 ½”
• Bermuda Bay – 2 ¼” x 3 ½”
• Basic White – 4” x 5 ¼”; ½” x 2 ¾”, scrap for two otters/hats
• DSP: Dots Pattern – 1 ½” x 5 ½”

Stripes Pattern – 1” x 4 ¼” (cut 2)


Instructions:


1. Fold card base in half at 4 ¼” and burnish.  Using VersaMark ink, stamp hat over the entire front of card.
2. Attach 1” x 4 ¼” striped DSP approximately 1” up from the bottom of the card.
3. Attach the 1” x 5 ½” dots DSP approximately ¾” from the left side of the card.
4. Die cut the Bermuda Bay paper using the 2” x 3 ¼” Stitched Rectangle die.  Then emboss using the Checks Embossing Folder.  Attach to front of card as shown.
5. Stamp “It’s birthday time!” in Bermuda Bay ink on the ½” x 2 ¾” Basic White piece.  Punch the right side using the Lovely Labels Pick A Punch.
6. Attach to card using Dimensionals.
7. Use the Stamparatus to stamp the otter and his hat.  To align them, place the otter stamp on one Stamparatus plate so that the top of his head is right on one of the etched grid lines.  Stamp the otter using Memento Tuxedo Black ink onto grid paper to assist in the aligning process.  Remove plate and place the hat along the same grid line on a second plate.  Stamp the hat and adjust the stamp as needed to get the images aligned.
8. Once you have the images aligned, place scrap Basic White paper in the Stamparatus and stamp the otter and hat.  Repeat to make a second otter.  Fussy cut both otters out and color using Stampin’ Blends markers.
9. Attach one otter to the front of the card using Dimensionals.
10. Attach In Color Jewels as desired.
11. On the 4” x 5 ¼” Basic White piece, stamp “It’s your day” stamp in Bermuda Bay ink near the top.
12. Attach the 1” x 4” piece of striped DSP at the bottom.
13. Cut a 5” piece of the 3/8” White Crinkled Seam Binding and color using the dark Magenta Madness Blends Marker.
14. Place a piece of Tear & Tape just above the striped DSP and attach the Crinkled Seam Binding wrapping around the back to secure.
15. Attach otter to piece and then attach to inside of card.


Continue Reading
No comments
Share:

Monday, 27 December 2021

Rainbow of Happiness

Rainbow of Happiness

All images © 1990-2021 Stampin’ Up!®


Supplies:


• Stamp Sets: Rainbow of Happiness (157721)
• Card Stock and Paper: Coastal Cabana Card Stock (CS) (131297)Magenta Madness CS(153080)Basic White CS (159276)Sunshine & Rainbows Designer Series Paper (DSP) (158126)
• Stamp Pads: Magenta Madness Classic Ink(153117)
• Miscellaneous: Baker’s Twine Essentials Pack(155475); Stampin’ Dimensionals (104430)Stampin’ Seal Adhesive (152813)


Measurements:


• Coastal Cabana CS: 8 1/2” x 5 1/2”score at 4 ¼” on the long side
• Basic White CS: 3 1/2" x 4 1/2”
• Magenta Madness CS3 5/8” x 4 5/8
• (3) DSP: 1” x 4 1/4”
• Basic White Baker’s Twine: 12”


Instructions:


1. Layer DSP strips onto Magenta Madness CS
2. Add this layer to the Basic White CS mat and wrap the Basic White Baker’s Twine around it; tie a bow.
3. Add this layer to the Coastal Cabana card base using Stampin’ Dimensionals
4. Fussy cut a rainbow and cloud image from the DSP and layer them onto your card front using Stampin’ Dimensionals
5. Stamp sentiment in Magenta Madness Classic Ink and fussy cut around phrase; layer onto card front


Continue Reading
No comments
Share:

Tuesday, 4 August 2020

Kick Up You Heels

Kick UP Your Heels
Totally loving the Zany Zebras stamp set from Stampin’UP! 
Such a cute set and thinking it’s a must to anyone’s stamp collection. 
And that colour combo, who would of thought, right! 
And to top it off you only need the stamp set, ink and some card stock! 


 Card base is 8 1/2”x 5 1/2” scored on the long side at the 4 1/4” 
Second piece is 5 3/8” x 3”
The piece which we stamped on is 5 1/8” x 2 3/4”
And the sentiment is stamped on a piece of card stock 2 1/8” x 1/2”

Thanks so much for stopping by.
Enjoy your day! 

Cheers
Sharon 🍻


Product List

Continue Reading
No comments
Share:

Monday, 29 June 2020

Lovely You

Lovely You
A super easy technique with the supplies you have.
Love how the colours pop on these card.
What I love  about this technique is that you can change up the colours to what ever you like.
You can check out the video on my Facebook.com/creatinwithsharon


Here’s the bit and bobs 

A card base 8 1/2” x 5 1/2” scored on the long side at 4 1/4” 
The next is 5 1/4” x 4”
And the third is 5” x 3 3/4”
 This is the piece that I coloured randomly with the inks listed below or you can choose your favourite colours. You can use a sponge or the blending brush to colour the card stock. Once you’ve coloured the card stock,  you’re gonna ink up your images with versa and stamp them onto the different colours. Be sure you stamp in odd numbers. Just to keep it aesthetically pleasing.
Sprinkle with the clear embossing powder. Warm up your heating tool and move over the embossed images until they’re set.
With a sponge ink up with the Memento and rub over the whole piece you just heat embossed.
With a piece of a paper towel rub the memento off of your clear embossed images.
Now to assemble your card.
With your liquid glue, glue the second piece of card stock onto your card base.
And now add your beautifully made DSP.
You’ll need a piece of card stock 1”x 4” and I punched it with with the Lovely Labels Punch.
The second piece for the sentiment is 1/2” x 3 1/2”  you’re going to stamp the sentiment with one of the colours you used .
 Thanks for stopping by greatly appreciate it have a wonderful week
Cheers🍻


Product List

Continue Reading
No comments
Share: