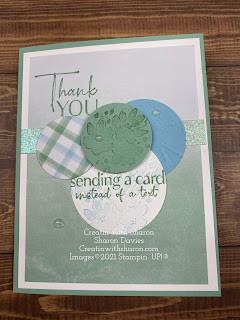
Showing posts with label layering circle dies. Show all posts

Tuesday, 1 February 2022

Flowing Flowers Card 4


Stamps: 157880 Flowing Flowers
Paper: 158039 Abstract Beauty Designer Series Paper, 159276 Basic White Cardstock, 153079 Mint Macaron Cardstock, 146982 Balmy Blue Cardstock, 158068 Supple Shimmer Specialty Paper
Ink: 153115 Mint Macaron Ink Pad, 147105 Balmy Blue Ink Pad
Embellishments: 158134 Polished Dots, 104430 Stampin' Dimensionals
Tools: 149653 Stampin’ Cut & Emboss Machine, 151770 Layering Circles Dies, 154317 Painted Texture 3D Embossing Folder
DIRECTIONS
1. Cut Mint Macaron Cardstock to 8-1⁄2” x 5-1⁄2” and fold in half.
2. Cut 2 pieces of Basic White Cardstock to 4” x 5-1⁄4”. Stamp flower in
Balmy Blue on 1 piece and attach to inside of card. Attach the other
piece to card front.
3. Cut Designer Series Paper to 3-3⁄4” x 5”, stamp sentiment in Mint
Macaron and attach to card front.
4. Cut Supple Shimmer Specialty Paper to 4” x 1⁄2” and attach to
Designer Series Paper.
5. Die-cut circles from Basic White Cardstock, Balmy Blue Cardstock, Mint
Macaron Cardstock and Designer Series Paper. Emboss Balmy Blue
circle with Painted Texture 3D Embossing Folder.
6. Stamp flower in Balmy Blue and sentiment in Mint Macaron on Basic
White Circle and layer circles on card front. Stamp flower in Mint
Macaron on Mint Macaron circle and attach with Dimensionals.
7. Embellish card with Polished Dots.
Here’s my video 

Continue Reading
No comments
Share:

Flowing Flowers Card 1


SUPPLY LIST
Stamps: 157880 Flowing Flowers
Paper: 158039 Abstract Beauty Designer Series Paper, 159276 Basic White Cardstock, 119793 Calypso Coral Cardstock
Ink: 132708 Memento Ink Pad, 147050 Calypso Coral Ink Pad, 147108 Petal Pink Ink Pad
Embellishments: 158140 Cotton Ribbon Combo Pack, 158134 Polished Dots, 104430 Stampin' Dimensionals, 103683 Mini Glue Dots
Tools: 149653 Stampin’ Cut & Emboss Machine, 151770 Layering Circles Dies, 103579 Paper Snips Scissors
DIRECTIONS
1. Cut Calypso Coral Cardstock to 8-1⁄2” x 5-1⁄2” and fold in half.
2. Cut Designer Series Paper to 5-1⁄4” x 4” and Die Cut the 2 inch circle from the front. attach to card base.
3. Die-cut 1 3⁄4 inch circle from Basic White Cardstock with Layering Circle Dies. Stamp flowers in Petal Pink and
sentiment in Memento on Basic White circle. Layer in the circle.
4. Stamp flowers on Basic White Cardstock in Calypso Coral and Petal Pink, cut out with Paper Snips and
attach to card with Dimensionals.
5. Tie a double bow of Petal Pink Ribbon and attach to flower with Mini Glue Dots.
6. Cut Basic White Cardstock to 5” x 3-3⁄4” and stamp flowers in Petal Pink. Stamp sentiment in Calypso Coral
and attach to inside of card.
7. Embellish card front with Polished Dots.

Here’s the video for you.


Continue Reading
No comments
Share:

Friday, 14 January 2022

Amazing Silhouettes


Amazing Silhouettes

All images © 1990-2022 Stampin’ Up!®


Supplies:


Stamp Sets: Amazing Silhouettes (157814)
• Card Stock and Paper: Crumb Cake (120953), Basic White (159276), Early Espresso (119686)
• Stamp Pads: Versamark (102283), Sunshine & Rainbows DSP (158126)
• Tools: Heat Tool (129053), Stampin’ Emboss Powders Basics (155554), Layering Circle dies (151770), Painted Labels dies (151605), Stripes & Splatters 3D embossing folders (157980)
• Miscellaneous: Stampin Dimensionals(104430)Stampin’ Seal Adhesive (152813), Linen Thread (104199)


Measurements:


• Crumb Cake: 4 ¼” x 11”
• Crumb Cake: 1 ¾” x 4 ¼”
• Sunshine & Rainblows: ¾” x 4 ¼”
• Linen Thread:14”


Instructions:


1. Cut a 4 ¼” x 11” Crumb Cake card base. Fold in half.
2. Stamp the leaf image (3x) across the middle of the card front using Versamark ink.
3. Sprinkle the images with White embossing powder and heat set.
4. Cut a 1 ¾” x 4 ¼” piece of Crumb Cake cardstock.
5. Emboss using the Splatters embossing folder.
6. Wrap a 14” piece of Linen Thread (2x) around the cardstock and tie in a bow on the right side.
7. Adhere along the bottom of the card front.
8. Cut a ¾” x 4 ¼” piece of Soft Seafoam designer paper.
9. Adhere above the Splatter embossed cardstock.
10. Cut a swirl label from Basic White cardstock and adhere to the card front.
11. Stamp the sentiment onto a 2 ½” x 2 ½” (or scrap) piece of Early Espresso cardstock using Versamark ink.
12. Sprinkle with White embossing powder and heat set.
13. Cut using the 1 7/8” Layering Circle die.
14. Cut a 2” Layering Scallop Circle from a 2 ½” x 2 ½” (or scrap) piece of Basic White cardstock.
15. Adhere the circles together.
16. Adhere the circle to the label using Stampin’ Dimensionals.


Continue Reading
No comments
Share: