Showing posts with label Creatin with Sharon. Show all posts

Wednesday, 7 October 2020

Merry Moose Christmas Card.

Week One of My 12 Weeks of Christmas 

A Classic Canadian card.

 Nothing says Canadian then a little bit of plain and a Moose, right! 

This weeks card we’ll be using the Merry Moose Bundle and the Best Plaid Builder Dies. 

And add a little texture with the Evergreen Forest 3D embossing folder.


Here’s the Bits and Bobs for this card

Your Real Red Card Base is 5 1/2“ x 8 1/2“ scored on the 

8 1/2” side at 4 1/4 “. Then with a piece of Whisper White card stock, that’s cut at 5 1/2 x 4 1/4“ and with the larger square die from the Best Plaid Builder Die. Place them together and  run them through your Diecut machine.

With the other Square die from the Best Plaid Builder Die set and a piece of Basic Black Card Stock that’s cut 5 1/2“ x 4 1/4“. Place these two together and run them through your diecut machine. With your adhesive (I used a liquid adhesive) lightly run it around the whisper white diecut piece and adhere it onto the Real Red card base. Once that’s done take the Basic Black die cut piece and glue it on top of the whisper white. Again, use a liquid adhesive because it gives you a little give put your pieces into place.

With the small trees from the In The Pines, stamp them in the Memento ink and onto left hand side of  a piece of  1 1/2“ x 5 1/2“ Old Olive card stock. Let’s add a little dimension to your card. Take the Evergreen Forest Embossing folder and  the Old Olive piece through your die cut machine. Once you’ve embossed this piece, added to your card. Place it in the centre of the plaid.

It’s time to add the sentiment.

 Take a piece of scrap Whisper White and the largest oval die from with Stitched Shaped dies. And run them through your die cutting machine.  Stamp the little trees to the left  and your sentiment above them. Add a few dimensions on the backside and  adhere it onto the card. Be sure to line up the trees up with the trees on the piece of Old Olive.

Grab a scape piece of Basic Black card stock and the Merry Moose pouch. And punch yourself a moose. Cut  a 6 inch piece of ribbon for the scarf and tied it around the neck of the moose. I just tied a knot. Add  a few dimensions to the backside of the Moose and adhere him onto the card.

Tata your done. Isn’t the Card the  cutest! 

Oh, we need to finish the inside of the card, don’t we!

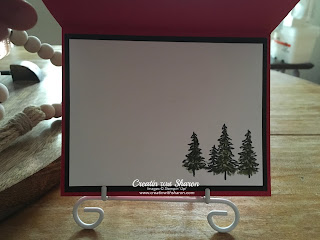
 With a piece of basic black card stock that is cut at 5 1/4“ x 4“ and a piece of whisper white card stock that is 5“ x 3 3/4. Glue them together and adhere them to the inside of the card.

With the Mini trees that you used for the front of the card, stamp  the inside right hand corner.

WAHOO! We’re done.


Hoping you enjoyed the first project for my 12 Weeks of Christmas.

See ya’ll next Wednesday 


Continue Reading
No comments
Share:

Thursday, 14 June 2018

Dandelion Wishes


Dandelion Wishes.
When I saw this Stamp Set it was a must have. And here’s the reason. 
I belong to a Facebook page called C.F.B Base Brats and the mascot for CFB Base Brats is the Dandelion. Cause you leave a little of you were ever you go. Most of us Brats (either kids or members of the services) have move every three to four years. Some have move for one end of the country to the other. Some all over the world. For me my Dad was in the RCAF. I was born in Chatham New Brunswick. And when I was six Dad was posted to Comox B.C. He has since retired and is now living in Penticton B.C.
My husbands  first posting was to Comox and of course that’s where I meet him. 
 He whisked me away. First to Moose Jaw, where we were married and our first son Willem was born. 
Then it was off to Colorado Springs CO.  Where Our baby, Kiefer was born. 
We spent four year there before they sent us to CFB Borden.
Borden was our longest posting. We were ther for seven years. Ric took his commission there. 
And his first posting as a commission officer was downtown Cold Lake Alberta. 
Where’s Cold Lake! It’s at the end of highway 28.
Then it was off the Winnipeg MB for six years. We loved Winnipeg. Loved it so much we came back after four years in North Bay. 
And we did this all in 27 wonderful years. 
And this wonderful journey will be coming to an end in about a year. 
I’m doing Card Class June 19;at the MFRC (Military Family Resource Centre) here in Winnipeg and this is one of the four cards we’ll be doing. So if you’re interested in attending let me
know and I’ll add you to list.

This was a super easy card simple card to make. Here’s how I did it. 
The base is a piece of thick Whisper White cut at 5 1/2 x 8 1/2 and scored at 4 1/4
You’re going to need a piece of Gray Granite that measures 5 1/4 x 4. 
And a piece of whisper white 5x 3 3/4.
Stamp your images using the Gray Granite ink. 
Easy Peasy. 


Continue Reading
No comments
Share:

Wednesday, 28 February 2018

Lots of Happy Card Kit


Here’s Cards I’ve made for my clients. 
A super fun kit, totally relaxing cards to make.  You colour, stamp and assemble. 
Sooo easy!

 I’m not a kit type person but OMG what a kit!
You won’t believe what you get with this.
 Makes 20 cards, 4 each of 5 designs, using the included Lots of Happy Stamp Set 
* Folded card sizes: 2" x 3-1/2", 2-1/2" x 4-1/2", 4" x 3-1/2", 4-1/4" x 5-1/2" (5.1 x 8.9 cm, 6.4 x 11.4 cm, 10.2 x 8.9 cm, 10.8 x 14 cm) 
* Includes set of 7 photopolymer stamps 
* Clear stamp block 
* 20 printed card bases and coordinating envelopes 
* Giftable kraft box 
* Printed, gold foil, white, and vellum die-cut accents 
* White/gold foil labels
* Basic Black Archival Stampin’ Spot 
* Full-size Watercolour Pencils in Flirty Flamingo, Lemon Lime Twist, Old Olive, and Rich Razzleberry 
* Lemon Lime Twist 1/4" (6.4 mm) Ombre Ribbon 
* Stampin’ Dimensionals 

All for $46. Wow what a deal!

Have a look at the kit, it’s on page 15 of the Occasion Catalogue! 

Here’s a few cards I completed in the class

Continue Reading
No comments
Share: