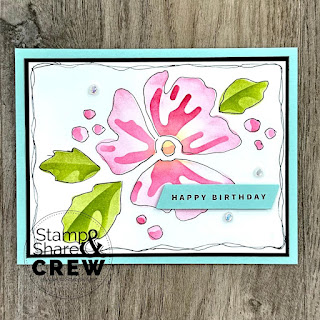
Loveliest Layers Decorative Masks
All images © 1990-2023 Stampin’ Up!®
Supplies:
• Stamp Sets: Something Fancy (160416)
• Card Stock and Paper: Pool Party Card Stock (122924); Basic Black Card Stock (121045); Basic White Card Stock (159276)
• Stamp Pads: Polished Pink Classic Stampin’ Pad (155712); Daffodil Delight Classic Stampin’ Pad (147094); Melon Mambo Classic Stampin’ Pad (147051); Pear Pizzazz Classic Stampin’ Pad (147104); Granny Apple Green Classic Stampin’ Pad (147095); Tuxedo Black Memento Ink (132708)
• Tools: Something Fancy Dies (160424); Loveliest Layers Decorative Masks (160517)
• Miscellaneous: Basic Black Stampin’ Write Marker (100082); Small Blending Brushes (160518); Flat Adhesive-Backed Pearls (160449); Stampin’Dimensionals (104430); Stampin’ Seal Adhesive (152813); Mini Stampin’, Cut & Emboss Machine (150673)
Measurements:
• Pool Party Card Stock: 8 1/2” x 5 1/2”, ¾” x 3 ½”
• Basic Black Card Stock: 5 3/16” x 3 15/16”
• Basic White Card Stock: 3 ¾” x 5”
Instructions:
1. Tape, with painters’ tape or washi tape, the Basic White on Scrap paper. Tape the large flower mask over the cardstock it should cover it completely.
2. With a small blending brush, using a circular motion, apply Polished Pink Ink avoiding the center of the flower and darkening the edges of the flower petals.
3. With a small blending brush apply daffodil delight ink to the center of the flower.
4. Remove that mask and overlay the Basic White with the flower detail mask and tape down. With a small blending brush apply Melon Mambo ink over the whole mask openings. Remove Mask and tape down the leaves mask.
5. Using a small blending brush apply Pear Pizzazz Ink to the leaves. Remover mask and apply detail leaf mask and tape down.
6. Using a small blending brush apply Granny Apple Green ink to the leaf details. Remove this mask.
7. With a Black Stampin Write marker and the fine tip outline all images give it a whimsical look. Outline the edges of the paper going around it two times with a wavy hand overlapping your lines back and forth.
8. Stamp the greeting on the strip of Pool Party and die cut with a Mini Stampin’, Cut & Emboss machine. Adhere greeting to card as shown using Stampin’ Dimensionals
9. Adhere the layers to the card base.
10. Add 3 Flat Adhesive Backed Pearls


.jpeg)

.jpeg)


No comments:
Post a Comment