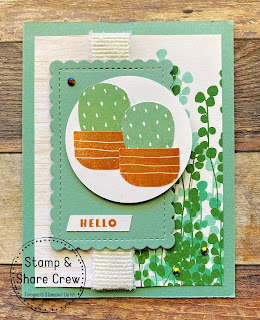
Cactus Cuties Card
All images © 1990-2022 Stampin’ Up!®
Supplies:
• Bundle: Cactus Cuties (158058)
• Card Stock and Paper: Bloom Where You’re Planted Designer Series Paper (155696); Basic White Cardstock (159276); Soft Succulent Cardstock (155776)
• Stamp Pads: Soft Succulent Classic Stampin’ Pad (155778); Cinnamon Cider Classic Stampin’ Pad (153114)
• Miscellaneous: Scalloped Contours Dies (155560); Layering Circles Dies (151770); 2021-2033 In Color Jewels (155571); White ¾” Frayed Ribbon (158138); Stampin’ Dimensionals (104430); Stampin’ Seal Adhesive (152813); Scotch Tape
Measurements:
• Soft Succulent Card Base: 5 ½” x 8 ½” scored at 4 ¼”
• Bloom Where You’re Planted Designer Series Paper: 1 ½” x 5” and 2 ¼” x 5”
• Basic White Cardstock: 1 3/8” x 3/8”
• Scrap Basic White Cardstock for stamping and punching
• White ¾” Frayed Ribbon: 6” long
Instructions:
1. Using the scrap piece of Basic White cardstock, stamp your cactus image with Soft Succulent ink and your pots with Cinnamon Cider ink. Punch these out with the Cactus Builder punch and layer onto the Basic White circle die cut piece with Stampin’ Seal adhesive.
2. Lay your two pieces of Designer Series Paper side by side upside down and use Scotch Tape to connect the two pieces together on the back side of the designs you want to show.
3. Wrap the White Frayed ribbon over the seam where the two pieces of Designer Series Paper connect and with Scotch Tape, adhere the ribbon to the back of the patterned paper.
4. Flip over and adhere to your card base using Stampin’ Seal adhesive.
5. Using Stampin’ Dimensionals, add the Soft Succulent piece of cardstock cut with the Scalloped Contours dies to the card base over the ribbon.
6. Add the circle die cut with Stampin’ Dimensionals to the card base.
7. Stamp your sentiment using Cinnamon Cider ink onto the smaller piece of Basic White cardstock and embellish with the 2021-2023 In Color Jewels!


.jpeg)

.jpeg)


No comments:
Post a Comment